Recipes
Recipes
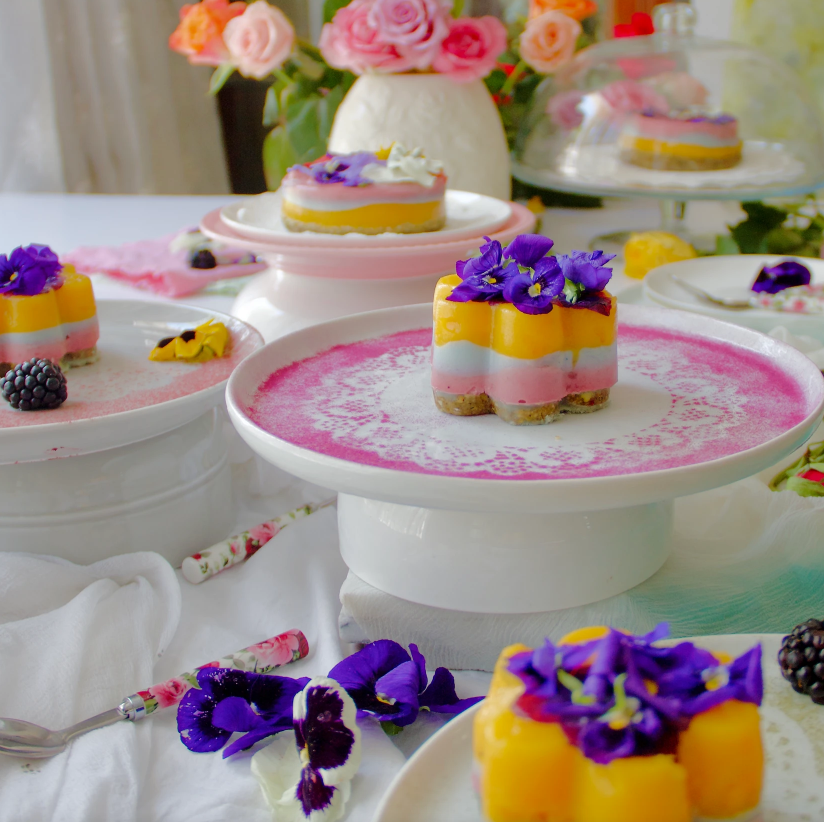
Berry Mango Blossom Mini Cakes
by LIVING JIN on Nov 03 2022
Spring is a season of colours, with blossoming of flowers and abundance of fruits. This Influenced me. Passionate about your health, then this fruit lover's dream is just for you. Loaded with fresh fruits with a nutty, crunchy base and sugar free , it satisfies your sweet cravings guilt free. Anyone who loves food. In Uae it would cost Aed 45. In the USA probably $ 5.5 - 6.
★Funfact! colourful vibrant sweet , Has a fragrant aroma
★ DETAILS
Prep Time: 20 minutes Cooking Time: 18 minutes Cooling Time: 2 hours Total Time (prep + cooking + cooling): 2 hours 38 minutes
Serve for 6 individual portions and two, 4 inches cakes
★SUITABLE DIET
vegan, vegetarian, gluten free, sugar free, protein rich, wholefood plant based
★ INGREDIENTS
Base
¼ cup each of roasted buckwheat groats, gluten free oats, pistachios, pumpkin seeds, golden raisins , 4 pitted dates, 3 tbsp pistachio butter, 1tsp each of cardamom powder, vanilla extract, few fresh mint leaves, pinch of salt.
Mango Fruit Layer
300g ripe mango puree, 2tsp agar agar powder, 50g fresh pineapple puree, 175g water, 30g finely chopped mango
Blue Spirulina Layer
250g thick cashew milk, 175g water, 2tsp agar agar powder, 1tsp blue spirulina powder, few blackberries.
Strawberry Layer
250g strawberry puree, 175g water, 2tsp agar agar powder, 115g thick coconut milk, few cut strawberries.
White chocolate 30g, a pinch of green spirulina. Fresh edible flowers to decorate.
★ INSTRUCTIONS
1. Base
Blend the dates and raisins. To it add the rest of the ingredients except nut butter and blend to a coarse sticky mix. Lastly, add the nut butter. Knead into dough. Place the dough between 2 parchment paper and roll it approximately ¼ cm thick. Cut out circles. Take 6 circles and place them in the flower moulds to get flower shape. Refrigerate for 10 minutes and take them out of the mould. They are ready.
2. Place the remaining 2 circles on the bottom of the 4 inch cake tin
3. For the flower moulds - Place the fresh flowers at the bottom.
4. Mango layer
dissolve the agar agar in the water. Bring to a boil, stirring continuously. Now add the mango and the pineapple purees to the boiling water. Stirring continuously. Once thickened, let it cool a bit, then pour into the moulds. Sprinkle some cut mangoes on top of it.
5. Blue Spirulina layer
dissolve the agar agar in water, bring to boil and add the milk and 1 tsp spirulina powder. Once thickened pour over the mango layer and add some blackberries.
6. Strawberry layer
dissolve the agar agar in water, bring to boil. Now, add the milk to it and let it boil. Take off the flame and add the strawberry puree to it. Combine well. Pour over the blue spirulina layer. Top it off with cut strawberries.
7. For the 4 inches mini cakes
follow the same procedure of fruit layers simultaneously and then decorate with fresh flowers.
8. Cool in the fridge till set.
9. Only for the 6 individual mini cakes. Melt white chocolate in Bain Marie style. Add green spirulina powder. Spread the melted chocolate on the crunchy base and immediately place the fruit layers on top of it. This will fuse the fruit layers with the crunchy base together. Place in the fridge for a few minutes.
※
For base -mint and cardamom is optional . i like the freshness of mint. Seeds , nuts and nut butter can be as per your taste buds.. Can also replaces dates and raisins with alternative sweetener. Can buy Kasha , or roast buckwheat groats at home till they turn golden brown. Fruit layers- can use fruits of your choice. Fruits need to be ripe and sweet. Coconut or cashew milk or a combination of both is the best. Decorate with or without flowers.
Made by Mona Irfan
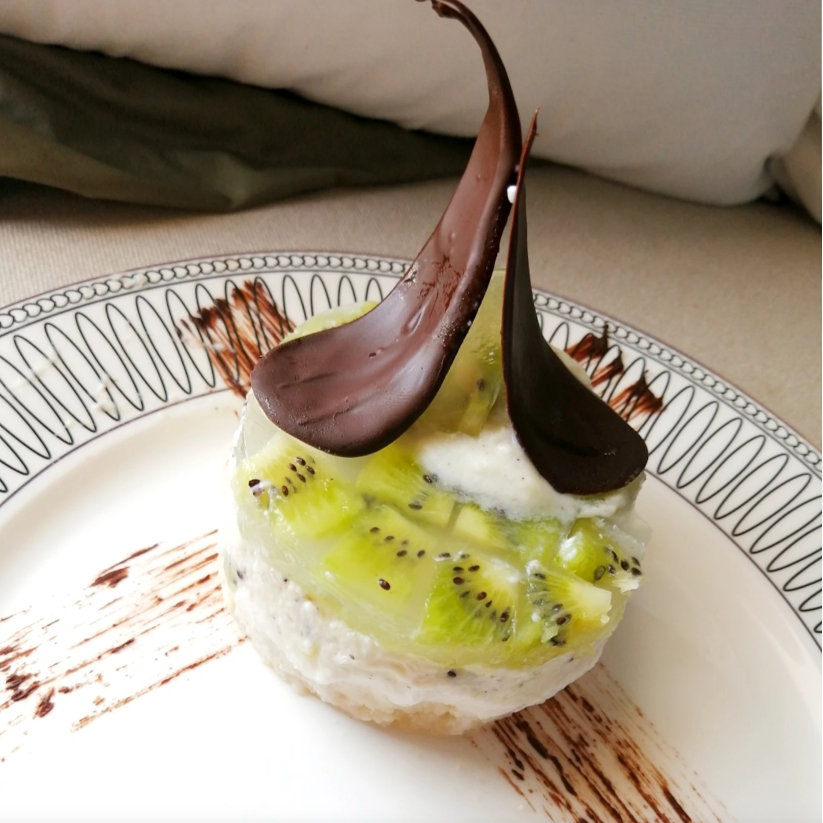
Recipes
by LIVING JIN on Nov 03 2022
Spring is in the air!! Colourful spring dessert to celebrate the season with kiwi dessert. A creamy dessert with kiwi goodness, it's a perfect spring dessert I think. This dessert is my preparation made with agar agar. Sponge cake filled with incredible light mousse and kiwifruit pieces. Kiwi jelly on top. A spectacular no-bake kiwi mousse cake is a perfect spring dessert.
★ DETAILS
Prep Time: 15 minutes Cooking Time: 20 minutes Cooling Time: 35 minutes Total Time (prep + cooking + cooling): 70 minutes
Serves for 6 people
★SUITABLE DIET
vegan, vegetarian, halal
★ INGREDIENTS
Cake Layer
Vanilla sponge cake - 100g
Kiwi puree - 1/2 cup
Sugar - 1/4 cup
Mousse Layer
Agar-agar powder - 1 tablespoon
Water - 1/2 cup
Whipping cream - 250ml
Chopped kiwi pieces - 3/4 cups
Condensed milk - 1/2 cup
Kiwi Jelly Layer
Kiwi cubed pieces - 3/4 cup
Sugar - 1/2 cup
Agar-agar powder - 1 teaspoon
Water - 3/4 cup
★ INSTRUCTIONS
1.Cake layer : In a thick bottom saucepan boil water, kiwi puree and sugar for 5 minutes. Switch off the flame and stain them. Place the thin cake layer in the pudding tray. Drizzle some kiwifruit juice on top of the cake layer.
2. Mousse layer : Boil the agar agar powder with 1/2 cup water. When it dissolved completely switch off the flame and set it aside for 5 minutes. Whip the cream until thick and add agar-agar mixture and condensed milk. Fold gently. At last add kiwifruit pulp and chopped kiwifruit pieces. The mousse layer is done now. Pour over the cake layer. Refrigerate until it sets.
3.Kiwi jelly layer : Boil water, agar agar and sugar in a thick bottom saucepan. When it dissolved completely. Switch off the flame. Arrange the kiwifruit pieces in a square tray and pour the agar jelly layer over the fruits. Refrigerate until it's done. Cut into any shape you like and arrange the top of the mousse layer. Serve chilled.
Made by Mrs Sohail
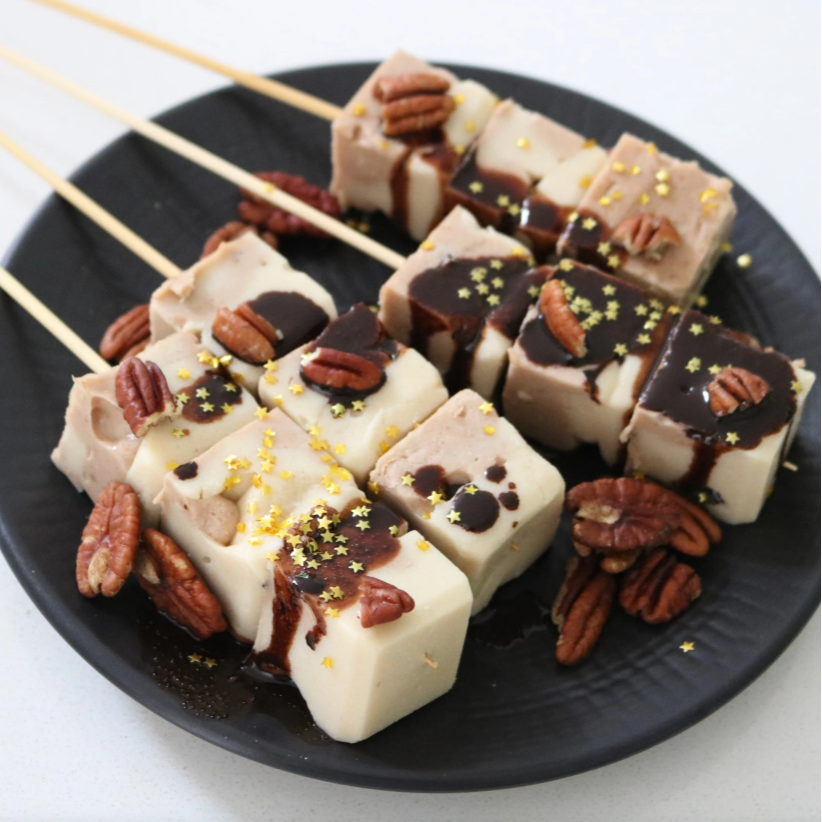
Recipes
by LIVING JIN on Nov 02 2022
#Dairy-free #Vegan #Vegetarian #Gluten-Free #Peanut-Free
Summertime bonfires are not the same as a vegan... Missing out on making smores and roasting little white marshmallow puffs over the fire is a tragic moment! Which is why I wrote this recipe. These are inspired by the cutest Japanese dessert, Dango, which are sweet, colored dumplings served on skewers. They can also be roasted over a fire. This is especially appropriate since Agar Agar (the key ingredient here) had its first recorded use in Japan.
I am a female 24-year-old, living in Costa Rica and originally from South Africa. Apart from being a vegan chef and recipe creator, I teach yoga, enjoy traveling, and hiking through nature. I found joy in working in the kitchen since I was a child and although I don't have a formal culinary education, cooking is now my greatest passion. My dream is to travel the world, serving vegan food to raise awareness around sustainability and reduce violence against animals.
Servings: 6
Total Time : 25 minutes.
Prep Time : Two ingredients must be soaked in water overnight. The rest can be prepped in less than 5 min.
Cooking Time : 20 minutes.
Shelf period : 5 days
Size of Container : 1" X 1" ice cube size, one tray makes 15 cubes.
INGREDIENTS
Rice Flour
Tapioca Flour
Soy Milk
Agar Agar Powder
Maple Syrup
Soaked Dates
Almond Butter
Blended Caramel Sauce
COOKER / TOOL
Skewer Stick
What is Dango? 🇯🇵
Dango (団子) is a Japanese dumpling made from rice flour mixed with uruchi rice flour and glutinous rice flour. It is different from the method of making mochi, which made after steaming glutinous rice. Dango is usually finished round shaped, three to five dango are often served on a skewer (skewered dango pieces called kushi-dango (串団子)).
(Reference from : Wikipedia)
★ TIP ★
Tapioca flour can be omitted, or use arrowroot powder instead.
🥣 DIRECTION
Step 1. First Layer
1/4 cup Rice Flour
1 Tbsp Tapioca Flour
3/4 cup Soy Milk
1 Tbsp Agar Agar Powder
2 Tbsp Maple Syrup
1)
Mix all ingredients thoroughly. Pour mixture into a medium pot and bring to a boil while continually stirring. It will smooth out and thicken. Once it is ready after about 7 minutes, pour into an ice cube tray, filling each space only halfway.
Step 2. Caramel Sauce
5 Soaked Dates
1/4 cup Almond Butter
1)
Soak the dates overnight, until soft like butter. Blend all the ingredients on high speed until it becomes a caramel consistency. Set aside the mixture.
Step 3. Second Layer
1/4 cup Rice Flour
1 Tbsp Tapioca Flour
3/4 cup Soy Milk
1 Tbsp Agar Agar Powder
Blended Caramel Sauce
1)
Repeat the steps used for the first layer and fill the other half of the ice cube shapes with the caramel marshmallow mixture. Leave to cool in the fridge for 20 minutes. Using a silicone ice cube mold will be essential because the marshmallows will pop out much easier. Skewer them, roast them or cover them with chocolate and edible stars.
♥︎
ENJOY! Your "Vegan Caramel Marshmallows"
from Mekaila Tyrrell
Click to go
@veganfairybites
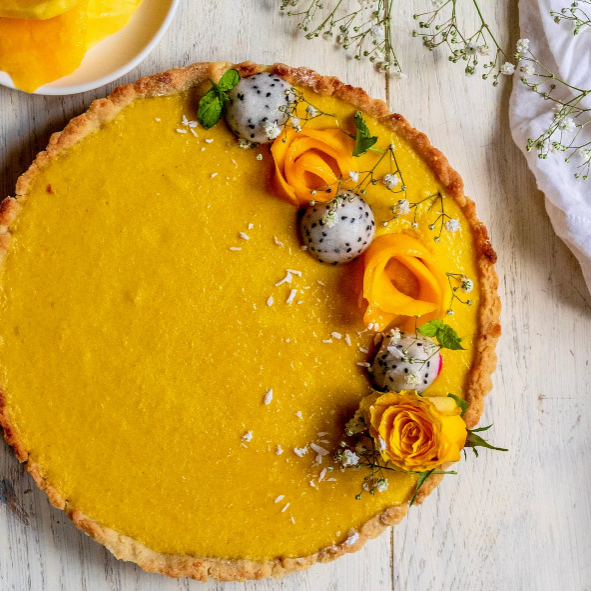
Recipes
by LIVING JIN on Nov 02 2022
1
A colourful spring dessert. Full of flavour and to die for. Made with a pie crust of almonds and a vibrant yellow filing of mangoes, turmeric, coconut and agar agar! Simple dessert for any occasion. Fun dessert for the Easter Holidays or afternoon tea treat. “Go on, I dare you to have a slice!” 😋
★Funfact!
Mango tart is free from unrefined sugars Mangoes contain high levels of vitamin C, fibre and pectin making it a perfect fruit that helps in controlling high cholesterol level. Another benefit of eating mangoes is that it cleanses your skin from deep inside your body. It treats pores and gives a glow to your skin. This tart also contains Agar Agar has many nutritional benefits including calcium, folate, fiber and manganese.
★ DETAILS
Prep Time: 15 minutes Cooking Time: 1 hour Cooling Time: 3 hours Total Time (prep + cooking + cooling): 4 and 15 minutes
Serves for 6 people
★SUITABLE DIET
Vegan, diary-free, gluten-free and vegetarian
★ INGREDIENTS
Pie crust ingredients
1/4 cup of flaked almonds or almond flour
1/4 of plain all purpose flour or gluten-free flour
25 grams soft vegan butter
Pinch of sea salt
1 teaspoon of powdered organic sugar
5 tablespoons of distilled water
Parchment paper and rolling pin
Mango filing
1/2 cup of full fat coconut cream
1 mango pureed
1 teaspoon of cardamom powder
1 teaspoon of turmeric powder
1 teaspoon of vanilla
2 tablespoons of maple syrup (optional)
1 teaspoon of gluten-free organic corn flour or tapioca
1 teaspoons of Agar agar
★ INSTRUCTIONS
1. Preheat the oven to 400°F (200°C).
2. Add dry ingredient to a mixing bowl: Almond flour and plain flour
3. Add powder sugar with a pinch of salt
4. Add vegan butter (very soft at room temperature) to the dry ingredients
5. Rub vegan butter well into the flour mixture
6. Add distilled water a little at a time. Slowly forming the ingredient to a dough
7. Add dough to parchment paper. Knead for 2 minutes before rolling out the pastry.
8 Add pastry to a non-stick quiche tin with removable base 300mm
9. Place in the refrigerator for 20 minutes
10. Remove from the fridge, place baking beans to the pastry and bake for 15 minutes.
Remove pastry from the oven and set aside whilst making the tart filling
11. For the filing add coconut cream to a saucepan with cardamom pod and vanilla followed by corn flour.
12. Whisk into a light custard
13. Puree the mango and add this to the coconut custard
14. Mix the mango and coconut custard.
15. Add Agar Agar to the mixture. Mix well until the Agar Agar is well dissolved.
16. Pour the filing ingredient to the pastry case
17 Leave to until cooled
18. Place in the fridge for 4 hours or overnight for best results.
Decorations
Mango roses / Edibles rose / Dragon fruit
(this is optional! Delicious on it’s own)
※ Store in the fridge and use within 3 days. Enjoy 🙂❤
Made by Monica - Nutritiouslymonica
Recipes
by LIVING JIN on Nov 02 2022
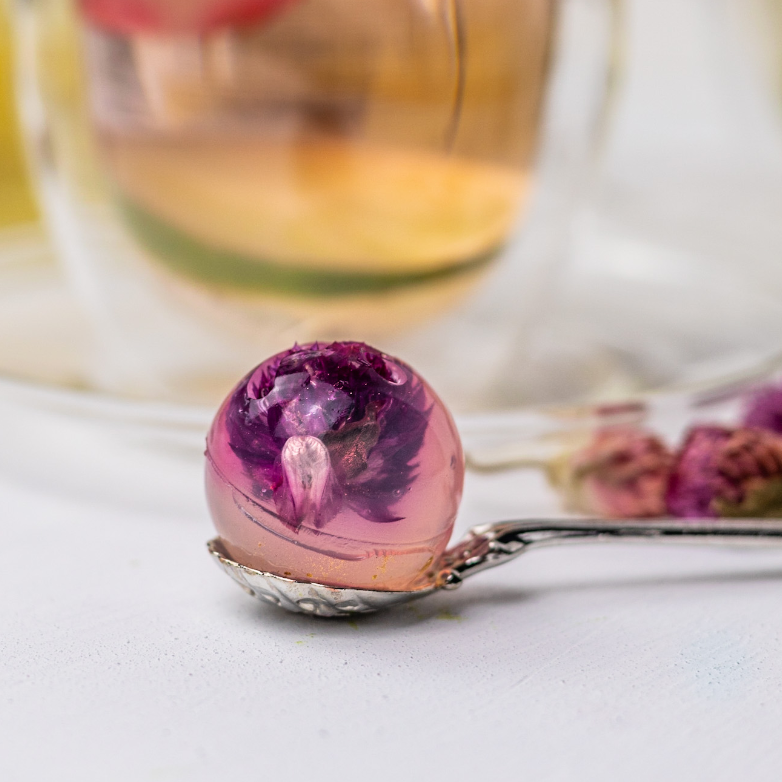
I was inspired by the beautiful blooming flowers in the spring season to make this unique and delicate recipe, to create a tea party at Nooria Cafe with Fairies. These tea bombs are a dessert kind of tea because they're sweetened with delicious drops of monk fruit. These are made from beautiful spring bloomed flowers like Gomphrena Globosa Linn, Red Globe Amaranth, Pink Roses, Jasmine Flower and Don’t forget me. The tea it’s made for everyone, kids and adults to bring joy and laughter at the tea party at Nooria Cafe. It feels like a tea party with Fairies where Fairies are serving the tea to little girls dressed up as princesses and boys as princes. The tea is affordable for everyone and the price is $5 per cup with a beautiful blooming tea bomb and lemon candy shapes.
★Fun fact!
These delicate and unique tea bombs are best made with little one and listen to a fairy background music for the best experience and fun.
★ DETAILS
Prep Time: 30minutes
Cooking Time: 5minutes
Cooling Time: 25minutes
Total Time (prep + cooking + cooling): 1 hour
Serves for 7 people
★SUITABLE DIET
vegan, vegetarian, dairy-free, gluten-free, low-carb, keto, paleo.
★ INGREDIENTS
- 2 ½ cups water
- 3 tsp agar agar powder
- 1 tsp pure rose nectar
- 18 drops monk fruit sweetener
- ½ juice of a lime
- ½ juice of a lemon
- ½ slices of lemon
- ½ slices of lime
★ INSTRUCTIONS
1. In a pot bring to a boil 2 cups of water.
2. Add monk fruit sweetener
3. Add 2 tsp LIVING JIN official agar agar
4.Bring to a boil and add agar agar. Boil for 5 min until all is well dissolved.
5.In an ice mold shaped as balls place the edible flowers, edible gold in each ball.
6. Pour the agar agar boiled mixture on top of the flowers in the molds. Use a syringe to fill in the molds.
7. Set in the freezer for 15 min.
8. I a different pot bring ½ cups water + lime juice + lemon juice to a boil
9. add 1 tsp agar agar and boil for 5 min.
10. In a candy mold cut limes and lemons in a round shape and place them inside the mold.
11. Pour agar agar mixture on top and set in the freezer for 15 min.
12. Make any kind of tea ( I did chamomile ) and place one tea bomb and lemon candy inside each cup.
13. Enjoy
Made by Ligia Derecichei
Recipes
Strawberry Red Velvet Volcano Lava Cake
by LIVING JIN on Nov 02 2022
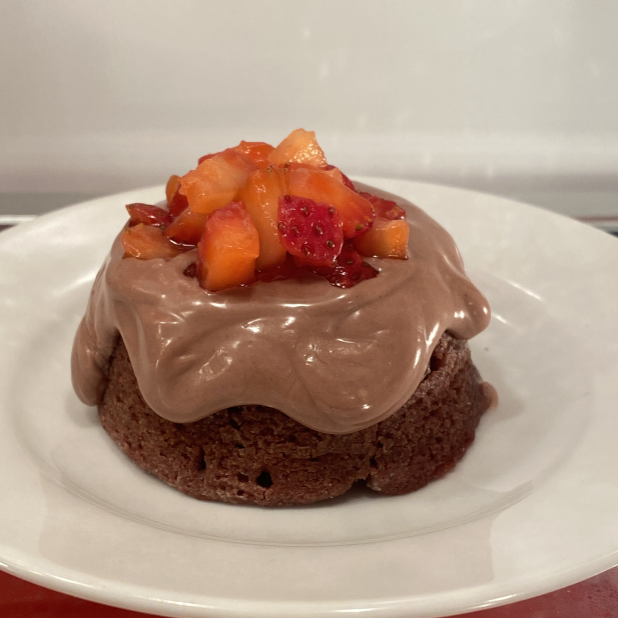
This was a hard recipe to come up with and ever since I was younger I loved anything red velvet. I'm not going to lie, thinking up something for a cheese volcano was very challenging until I thought of a lava cake. It literally has the word lava in it and works like a volcano. Then I had to think about how I would incorporate some type of cheese in that and I thought of cream cheese and that led me to think of red velvet. When you cut open into the “volcano” the cream cheese flows out like how I would imagine magma does when a volcano erupts. I would describe this dessert as a gift full of surprises. I would recommend this dessert to anyone who loves red velvet or anybody that wants to try something new.
★ DETAILS
Prep Time: 2hours 15 minutes
Cooking Time: 15-18 minutes Total Time: 2hours 30 minutes
Serves for: 18 people
Size of container: 2.75in (or any size)
Shelf Period: up to 1 week in the refrigerator
★ SUITABLE DIET
- Vegetarian
- Non-GMO
- Nut free
- No color
- For kids
★ INGREDIENTS
1 large beet or 2 medium beets
butter ¾ cup / 170grams
oat milk ¾ cup
vinegar 2 tsp
1 lemon
rice vinegar 2 tsp
vanilla extract 1 ½ tsp
flour 2 cups/200g
cocoa powder 3 tbs/ 24g
baking powder 1 ⅛ tsp/6g
salt 1tsp/6g
baking soda ½ tsp/3g
granulated sugar 1 ¾ cup/350g
eggs 3
cream cheese 1 8oz pack
butter ¼ cup
powdered sugar 1 cup powdered
strawberries 8oz
agar-agar powder 2 tsp
White chocolate ( optional )
Supplies needed :
Stand or hand mixer
Muffin pan or ramekin
Glass tupper ware
Spatula
Wired rack
Cookie sheet
Foil
Blender or food processor
★ INSTRUCTIONS
🧩 Step 1
1) Preheat your oven to 4000F.
2) Next, wash and dry your beets very well.
3) Then, wrap your beets in foil and let them bake in the oven for 1 hour or until a knife goes smoothly inside the beet.
4) Make sure you place your beets on a cookie sheet before they go in the oven to catch any drippings.
🧩 Step 2
1) After your beets have cooked turn off the oven and let them cool inside the oven. 2) Once they are warm to the touch you are going to peel and dice the beets up. 3) Set 1 cup of the beets to the side and if there’s any extra use them for another recipe.
🧩 Step 3
1) While the beets have been set aside we are going to make our buttermilk.
2) You can buy pre-made buttermilk but I prefer to make my own.
3) To the ¾ cup of oat milk, you are going to add 2tsp of vinegar and let set for a few minutes.
4) Now to a blender you are going to add your beets, buttermilk mixture, vanilla extract, and the juice of one lemon and blend till smooth.
🧩 Step 4
1) Now you are going to sift all your dry ingredients and have them in a separate bowl. 2) Then you are going to cream your butter and sugar till it’s fluffy then slowly add in the 3 eggs till it’s fully incorporated.
🧩 Step 5
1) Next, your gonna slowly incorporate the dry mixture and the wet mixture alternating turns.
2) Start with the dry mixture and end with the dry mixture.
3) Then mix till fully incorporated.
4) If there is separation in the batter or it starts to look clumpy that’s completely normal.
The processing photo are missing now, will update in future
🧩 Step 6
1) You are going to set the batter aside and now make the cream cheese mixture which is gonna be our “lava”. 2) In a bowl, you are going to cream 8oz of cream cheese and ¼ cup of butter together along with 1 cup of powdered sugar and 1tsp of vanilla extract.
3) Once it’s fluffy set it aside for later.
The processing photo are missing now, will update in future
🧩 Step 7
1) We are now going to make our “magma” that’s gonna go inside our “volcano”. 2) You are going to dice up 8oz of strawberries into small cubes.
3) After you dice up your strawberries add about ½ cup sugar to the strawberries and let them make their own “juice”.
4) What we are making is basically macerated strawberries.
5) After your strawberries have made their own juice you are going to separate your strawberries from the juice.
🧩 Step 8
1) In a saucepan, you are gonna add in the strawberry juice and let it simmer.
2) Once it’s up to a simmer you are going to add your 2tsp of agar-agar and pour in a container to set.
3) After it’s set, you are gonna dice your strawberry jelly or “magma”.
🧩 Step 9
1) Now it’s time to assemble our volcanos. 2) Preheat your oven to 350F. In a muffin pan or a ramekin, you are going to butter and flour it so it doesn’t stick or spray non-stick spray.
3) First, you are going to fill up the muffin tin cavity ⅓ of the way with batter.
4) Then you are going to scoop some of the cream cheese mixture and place it inside along with the cut-up strawberry jelly pieces.
5) Then put enough batter to cover the cream cheese and strawberry jelly.
🧩 Step 10
1) Then we are going to place the cakes in the oven to cook for 15-18 minutes.
2) After you take them out of the oven serve immediately and enjoy.
🧩 Step 11 (optional)
1) To make your volcano “fancy” after it comes out of the oven melt chocolate over the top and add the diced-up strawberries you have left.
★ Helpful Tips!
Take your time and make sure not to overfill the lava cake with cream cheese. Because once you flip them over to take them to the “lava”will go straight through the wired rack and you will now have a dormant volcano.
Made by Leyah Buster
Recipes
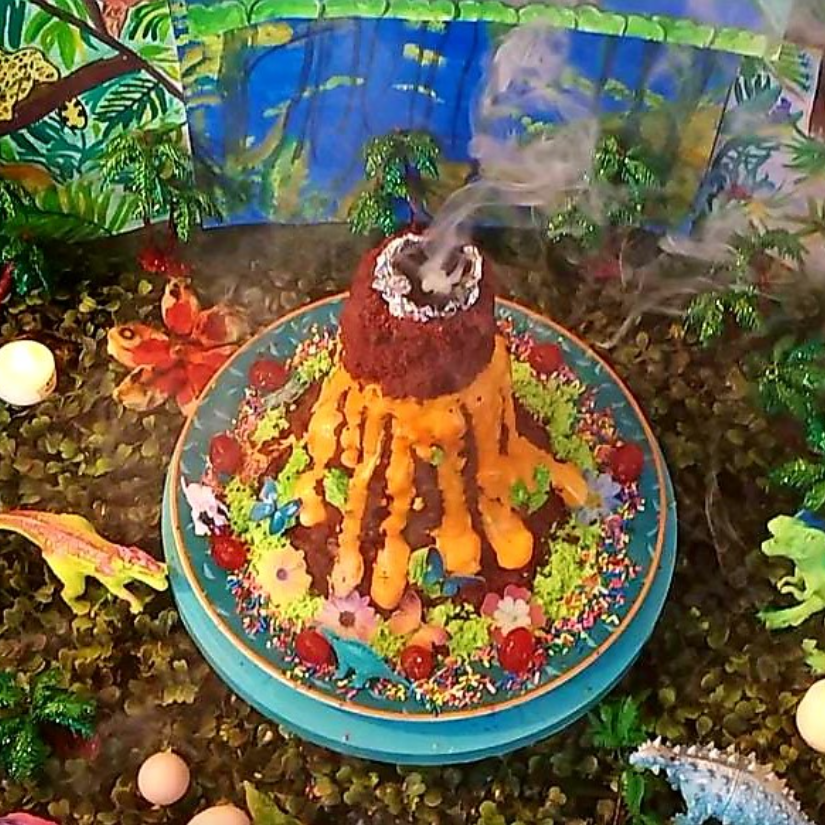
Lively Ooey Gooey Cream Cheese Volcanic Cake
by LIVING JIN on Nov 02 2022
1
Ever since my childhood, I have been watching my mother making scrumptious dishes with love and dedication. When I was in class VII, we had gone on a picnic and my mother had made choola with tricolor pulao, I helped my mother in little ways. During lunch when she opened the food basket, the aroma made everybody nostalgic not to mention the taste & flavor left everyone in awe. My mother was very happy, and I felt elated with appreciation. It was at that moment of, when I fell in love with cooking and serving to my family and friends and the trend continues.
★ DETAILS
Prep Time: 1hour 30 minutes
Cooking Time: 30 minutes Additional time: 15 minutes Total Time: 2hours 15minutes
Serves for: 6 to 8 people
Size of container:
Container 1 (height 7 inches / diameter 12.1cm)
Container 2 (height 4 inches / Diameter 11cm)
Container 3 (height 2 inches / Diameter 8.6cm)
Shelf Period: up to 7days under refrigeration
★ SUITABLE DIET
- vegetarian
- for Kids and everyone
★ INGREDIENTS
Chocolate Cake
All-purpose flour
Cocoa powder
Baking powder
Milk powder
Milk
Vanilla essence
Vegetable Oil
Cheesecake & Orange jelly
Agar-agar powder - 5g
Water - 1 cup
Full-Fat milk - 1L
Vinegar mixed (2 tbsp) mix with water (1tbsp)
Amul Fresh Cream - 2 tbsp
Utensils & Tools needed:
Turntable
Knife
Tongs
Mixer Grinder
★ INSTRUCTIONS
🍫 1. Chocolate Cake part
I know what you are thinking, no way this cake gets ready in 4 minutes. But I am here to tell you that it does.
One major benefit of making a cake in the microwave is that it takes very little time than it would take time in baking a cake in an oven. So, whether you are baking a cake last minute for any party or occasion that you forget, or just because you want to, then you must try this recipe.
My cake that comes in 4 minutes from the microwave is the most amazing in the world.
Step
1) In a bowl add all-purpose flour.
2) In the same bowl add sugar and mix well.
3) Add baking powder to it and mix well.
4) Make sure to be gentle and not knock out all the air from the batter.
5) Add cocoa powder and mix again.
6) Then add red color to it. After that, add oil to it and give it a good mix.
7) Then add milk to it.
8) Lastly, add in vanilla essence, mix it well.
9) Transfer your batter to a microwave-safe dish
(previously y greased with oil and dusted with flour).
10) Cook this in the microwave for around 4 minutes on high (100%) power.
11) Your cake is ready for a volcano eruption.
🧀 2. Homemade Cream Cheese with Agar-Agar part
Most of the time people buy cream cheese from the market, but today I am going to share my homemade simple and easy recipe for cheese cream.
Step
1) Take a large pot and add full-fat milk to the pot and heat it but do not boil
2) Add 2-tbsp vinegar and 1-tbsp water keep stirring and mixing
3) When Milk is busted drain out the water but do not wash it. We want the sourness of vinegar to be retained.
4) Take cottage cheese in the mixer grinder.
5) Add 2-3 tbsp fresh cream to it.
6) Add 2-3 tbsp Condensed milk to it to get creamy texture.
7) Now, close the lid of it and churn it for 2-3 seconds.
8) Now Cream Cheese is ready.
9) Now, to get started with the agar-agar solution, take a pan and heat 1cup of water.
10) Now, add 5grams of Agar-Agar powder to warm water.
11) Heat the agar-agar on a low flame and stir continuously. In about 5 minutes the agar-agar began to dissolve completely
12) Now add about 2 tbsp of the prepared Agar-Agar solution to cream cheese mixture and you can sieve it to remove any lumps. Keep aside the remaining Agar-Agar.
13) Refrigerate it for 1 hr.
14) Now cream cheese is ready as a filling of lava.
🍮 3. Homemade Agar-Agar Orange Jelly part
Homemade Orange Jelly, no need to buy ready mix from the market.
Step
1) Take the prepared 1 cup agar-agar Solution.
2) Add ½ tsp orange color and add ½ tsp orange essence to it and stir well.
3) Pour it in the bowl and refrigerate it for 30 minutes.
4) Now Orange Jelly is ready as a filling of lava.
🍫 4. Assembling of Cakes to give Volcano Looks
Step
1) Take the biggest cake of the three and place it on plate and hollow it from the center in thin cylindrical from.
2) Now, take the molten chocolate and spread on the sides and on top of the cake.
3) Now, place the medium sized cake on this and make it hollow from the center too.
4) Now trim the cakes from the side using a knife to give it a volcano shape and cover the complete cake with molten chocolate, from top and sides.
5) Now fill the hollow cavity of the cake with Agar-Agar Cream cheese, orange jelly and some sprinklers and decorate the cake with some paintings of woods, trees, dinosaurs, green grass made of white chocolate, etc.
6) Now close the top of the cake with smallest cake
7) Place a small piece of foil on the top.
8) Then place some burning coal on it.
9) Put a drop of clarified butter on it to give a smoky effect.
10) Finally, our Lively Ooey Gooey Cream Cheese Volcanic Cake is ready for eruption.
★ Helpful Tips!
Don’t leave the cake open as it will become dry.
Don’t boil water, just heat it for preparation of Agar-Agar solution.
Wash your hands before start cooking.
Made by Anjul Arora