Recipes

Recipes
Healthy No-Bake Vegan Mango Tart
by LIVING JIN on Dec 03 2025
👩🍳 About the Chef
My name is Ligia. I am a mother and a wife. I am passionate about creating healthy, simple food and dessert recipes. I am passionate about helping others take control of their health. I made this dessert as a healthier version of tart; it is a Vegan dessert.
Find me on Instagram: @ligiasfreshbowls
📝 Recipe Summary
This beautiful layered tart is a healthier, vegan version of a traditional tart.
Attribute
Detail
Servings
4 people
Total Time
2 hours 30 minutes
Prep Time
15 minutes
Cooking Time
15 minutes
Other Time
Chilling for 2–3 hours
Size of Container
5 inch round pan
📋 Ingredients
Component
Amount
Ingredient
Source
CRUST
$1/2$ cup
Walnuts
8
Dried Plums
$1/2$ cup
Oats
1 tsp
Coconut Oil
FIRST LAYER
1 cup
Coconut Milk
1 Tbsp
Coconut Sugar
$1 \frac{1}{2}$ tsp
Agar Agar Powder
SECOND LAYER
1 cup
Fresh Mango
$1/2$ cup
Coconut Water
2 Tbsp
Water
1 tsp
Agar Agar Powder
🔪 Directions
I. Crust
Mix walnuts, plums, oats, and coconut oil in a blender until the mixture becomes gooey and ready to spread at the bottom of the pan.
II. First Layer (Coconut Layer)
Mix coconut milk, coconut sugar, and Agar Agar Powder over medium heat and bring to a boil for 2 minutes.
Pour this layer on top of the crust and set in the refrigerator.
III. Second Layer (Mango Layer)
Mix fresh mango and coconut water in a blender until super smooth.
After this step, mix the mango purée, Agar Agar Powder, and 2 Tbsp water over medium heat and bring to a boil for 2 minutes.
Tip: Use low to medium heat for mixing the Agar Agar Powder on the stove with the other ingredients.
Take out the tart and pour the second layer on top.
Set the tart back in the fridge. Decorate with your fresh mango and strawberries.
IV. Notes
The tart stays good in the refrigerator for 3 days or keeps in the freezer for a longer time.
#VeganMangoTart #HealthyDessert #NoBakeTart #AgarAgarRecipe #CoconutSugar #GlutenFreeVegan #SimpleRecipe #MangoDessert #LigiasFreshBowls #VeganDessert

Recipes
Triple Berry Chocolate Mousse Tart
by LIVING JIN on Dec 03 2025
🍫 Triple Berry Chocolate Mousse Tart
👩🍳 About the Chef
Hi! I’m Chen Wong, a stay-at-home mom, food fanatic (more like a dessert fanatic!), a thrill seeker, and an experimenter. I love to try out new things, even if it means that I fail a bunch of times along the way. There is nothing more rewarding than to find a new recipe that no one has ever made before and it turns into a success!
INSTAGRAM @sweets.simplified | WEBSITE https://www.google.com/search?q=sweetsimplified.com
📝 About the Recipe
This recipe came with many trials and errors. There were so many failed attempts in trying to make the Agar Agar Powder and the mousse smooth, then there were other attempts in trying to make sure the fluffy and airy consistency of a mousse was right. A good mousse isn't too stiff, yet it is firm enough to hold itself together. Another important aspect of this recipe is the difficulty in managing chocolate. From melting it to helping it stay warm and liquid-like, to incorporating it with the colder whipped cream, timing is just about everything for this recipe.
📋 Ingredients
Component
Amount
Ingredient
OREO CRUST
50
Oreo Cookies
1 cup
Coconut Oil, melted
CHOCOLATE MOUSSE LAYER
1 cup
Heavy Whipping Cream
$1/4$ cup
Sugar
$1/4$ cup
Chocolate Chips
1 tsp
Agar Agar Powder
2 Tbsp
Hot Water
BERRY LAYER
1 cup
Mixed Berries
$1/4$ tsp
Agar Agar Powder
$1/4$ cup
Sugar
Servings
8–10 people
Total Time
6 hours
Prep Time
1 hour
Cooking Time
1 hour
Other Time
Chilling for 4 hours
Size of Container
$14 \times 5.6$ inch tart pan
🔪 Directions
I. Oreo Crust
Preheat the oven to $350^{\circ}\text{F}$.
Crush the Oreo cookies in a food processor until they are like fine sand. In a heatproof bowl, microwave the coconut oil until it has thoroughly melted.
Mix the melted coconut oil into the bowl of crushed Oreos. Use your hands to mix the melted coconut oil with the crushed Oreo cookies and then press it firmly into a tart pan.
Bake in the oven for 10 minutes before taking it out to cool in the pan.
II. Chocolate Mousse Layer
Melt Chocolate/Whip Cream: In a heatproof bowl, microwave $1/4$ cup of the heavy whipping cream at 30-second intervals until it starts to simmer. Once it starts simmering, immediately take it out and cover it with the chocolate chips. Make sure to spread the chocolate chips evenly. Allow it to sit for 1–2 minutes. In the meantime, pour the remaining $3/4$ cup of heavy whipping cream and sugar into a stand mixer and whip it until stiff peaks form. Set the whipped cream aside.
Activate Agar: Fill a separate small bowl with 1 Tbsp of water and the Agar Agar Powder. Microwave it for 10 seconds. Take it out to stir gently before placing it back into the microwave for another 10 seconds. Continue to do this until the Agar Agar Powder solidifies the water. Then, take the remaining 1 Tbsp of hot water and pour it into the Agar Agar Powder mixture. Stir until it becomes slightly loosened before placing it back into the microwave for 10 seconds. This will cause the Agar Agar Powder to transform back to a smooth thick liquid mixture.
Blend Chocolate: Once the chocolate chips have softened slightly, stir the chocolate mixture vigorously until it is completely homogeneous and all the chocolate chips have melted. (An immersion blender can be helpful in this process). Take a spoonful of the whipped cream left in the stand mixer and blend it into the chocolate mixture to balance out the temperature.
Fold Mousse: Once the whipped cream has been thoroughly blended, pour the chocolate cream into the whipped cream and gently fold them together. Continue to fold until there is no distinction between the chocolate cream and the whipped cream. Pour this chocolate mousse into the Oreo crust and refrigerate for at least 2 hours.
TIP: Chocolate and Agar Agar Powder are very time and temperature sensitive. You want to be sure to keep a close eye on them, continually checking and stirring them so that no film forms over each of those layers.
III. Berry Layer
Simmer: In a small saucepan, bring the blended mixed berries, sugar, and Agar Agar Powder to a slight simmer. Stir continuously until the sugar and Agar Agar Powder have been thoroughly incorporated, then turn off the heat and pour into a separate bowl.
Cool and Set: Allow the berry mixture to sit until it is cool to the touch. However, be sure to stir it occasionally to prevent a film from forming on the top. Once the berry mixture has been cooled, pour it over the chilled chocolate mousse layer and refrigerate for another 2 hours.
#TripleBerryTart #ChocolateMousse #OreoCrust #NoBakeDessert #AgarAgarRecipe #HomemadeTart #DessertFanatic #HomeBaking #SweetSimplified #ChocolateBerry

Recipes
Zephyr: Light and Beautiful Berry & Apple Dessert
by LIVING JIN on Dec 03 2025
🌸 Zephyr: Light and Beautiful Berry & Apple Dessert
👩🍳 About the Chef
Hi, my name is Madina, I'm 26 now and I live in New York for 5 years. My passion is baking! I love to make sweets, and make others happy when I give them my treats as a piece of my love! But the most important thing is, I am a mother of two wonderful babies, and I try to use the best and healthy ingredients for them. I hope you can enjoy my recipes too, and make your family or friends happier with a piece of your sweet masterpiece!
Find me on Instagram: @LazizMadina
📝 About the Recipe
Zephyr is a very light and full of vitamins dessert. It is also very beautiful to serve or place in a gift box. The best part? There is no flour, milk, and no baking! It consists of berries, apples, or any fruits you love and want to add.
📋 Ingredients
Component
Amount
Ingredient
PURÉE
1
Egg White (or substitute aquafaba in the same portion, approximately $40\text{g}$)
$1/2$ cup
Apple and Berry Purée (Total $150\text{g}$)
$1/2$ cup
Sugar
SYRUP
1 cup
Sugar
$1/2$ cup
Water
2 tsp
Agar Agar Powder
Yield
14–16 pieces
Total Time
8 hours 15 minutes
Prep Time
1 hour
Cooking Time
15 minutes
Other Time
Chilling for 7 hours
🔪 Directions
PURÉE Preparation
Prepare Apples: Wash and cut one green apple into 4 pieces. Put it in a saucepan, add 2 Tbsp water, and let it cook until very soft (about 15 minutes).
Combine and Simmer: Mash the apple, and strain it through a sieve. In a separate saucepan, add $200\text{g}$ of any berries you like (raspberries, blackberries, strawberries, or just banana). Mash them in the saucepan and simmer until the purée is very thick.
Strain and Measure: Strain the berry purée through a sieve and add it to the apple purée. The final weight of the mixed apple and berry purée should be $150\text{g}$.
Sweeten and Chill: Add $1/2$ cup of sugar while the purée is still warm; the sugar should be dissolved in the purée. Put the purée into the refrigerator until it's completely cooled (you can make it the night before).
Tip: Freeze remaining purée and use it for the next time.
Add Egg White: When the purée is chilled, pour it into a bowl of the mixer. Add 1 egg white (substitutes for aquafaba in the same portion, approximately $40\text{g}$).
SYRUP Preparation
Combine: In a saucepan, combine $1/2$ cup water, 2 tsp Agar Agar Powder, and 1 cup sugar.
Boil and Reduce: Place over medium heat, bring the syrup to a boil, then reduce the heat to low and cook for 5 minutes. Whisk continuously until the syrup has thickened and pours from a spoon without dribbling, or reaches $230^{\circ}\text{F}$ ($110^{\circ}\text{C}$).
Remove: Remove the syrup from the heat.
ZEPYHR Assembly
Whip Purée: Start beating the egg white and purée until it's very light and doubled or tripled in size. At the same time while beating egg and purée, proceed with the syrup.
Tip (Electric Mixer): If you have an electric hand mixer, beat the egg/purée until doubled in size. Then start the Agar Agar Powder Syrup, because you need to whisk the syrup constantly until it will be ready.
Add Syrup: With the mixer on the lowest speed, start pouring the syrup slowly into the egg and purée mixture. Be careful not to cook your eggs in the purée mixture.
Whip to Soft Peaks: When all syrup is poured, change the mixer to the highest speed and beat for 2 or 3 minutes until soft peaks form.
Pipe: Transfer the ready mixture to a piping bag with a Wilton 1M tip (or any tip you have) and pipe Roses onto parchment-lined baking sheets.
Set: Let them stabilize or dry for 6 to 12 hours.
Finish: When the roses have glossy tops and easily come off, match 2 halves together, sandwich them, and roll them in powdered sugar. Tasty and beautiful zephyrs are ready!
💡 Alternative Tip
If you don't want berries, you can make it with fruits, add orange zest, or cover it with dark chocolate.
You can also use zephyr as a filling layer in the cake, or use any silicone molds for the shape you want (do not forget to brush the mold with oil).
#ZephyrRecipe #HomemadeMarshmallow #RussianDessert #AgarAgar #NoBakeSweets #BerryDessert #PipingTechniques #HomemadeCandy #MadinaBakes #FruitPurée
Recipes
by LIVING JIN on Nov 03 2022
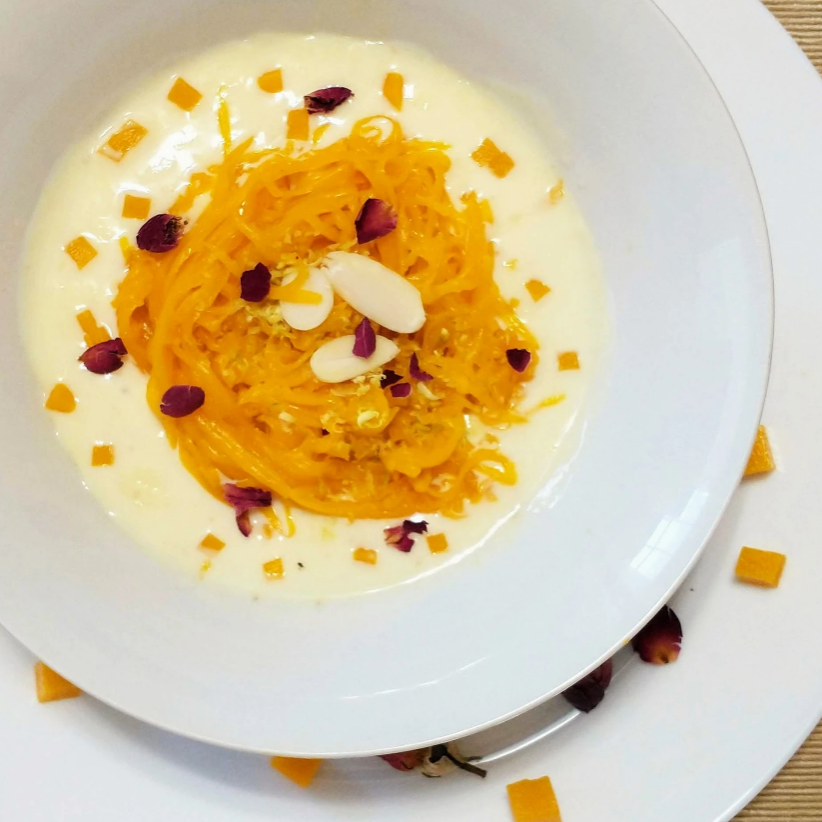
Mango Falooda
Details
Servings: 2
Total time: 2 hours
Preparation time: 30 minutes
Cooking time: 30 minutes
Additional time: Chilling for 1 hour
Shelf life: 3-4 days in the refrigerator
Ingredients
Mango puree - 1 cup
Agar agar powder 1 Tbsp
Milk/ Nondairy alternative - 2 cups
Sugar - 2 Tbsp
Cornstarch - 2 Tsp
Cardamom powder - a pinch (optional)
Instructions
1. Add 1 Tbsp Agar agar powder to 1 cup of mango puree and bring it to a boil. Keep stirring frequently. You can use store bought mango pulp or make it from scratch by putting chopped mango pieces in a blender and making a smooth paste. Add some sugar if the pulp is too sour or not sweet enough.
2. Turn off the stove as soon as it boils and pour into a container or mould to set. I used a 4”x8” glass baking dish. Keep it in the refrigerator until it sets (about 1 hour).
3. Demold and place the mango jelly block on a flat surface. Using a grater with small holes, grate the jelly block. Press the grater on one end of the block and drag it towards you in one single motion to get long noodle-like strands. Repeat this till you have the required amount of noodles. I used up about three fourths of the block to make noodles and cut up the remaining block into small cubes.
4. Heat milk or any nondairy alternative of choice in a saucepan. Add 2 Tbsp of sugar. Bring it to a boil. Make cornstarch slurry by dissolving 2 Tsp of cornstarch in a little water and add it to the hot milk. Keep stirring until the mix thickens. Add a pinch of cardamom powder and mix well. The cardamom powder gives a wonderful aroma to the mix, however you can skip it or add some vanilla extract instead. Turn off the heat and let the mixture cool down. Refrigerate it if needed.
5. For the final Step, pour some of the prepared milk mix into a bowl. Carefully place the mango jelly noodles. Garnish with some slivered almonds and rose petals (optional).
Recipes
by LIVING JIN on Nov 03 2022
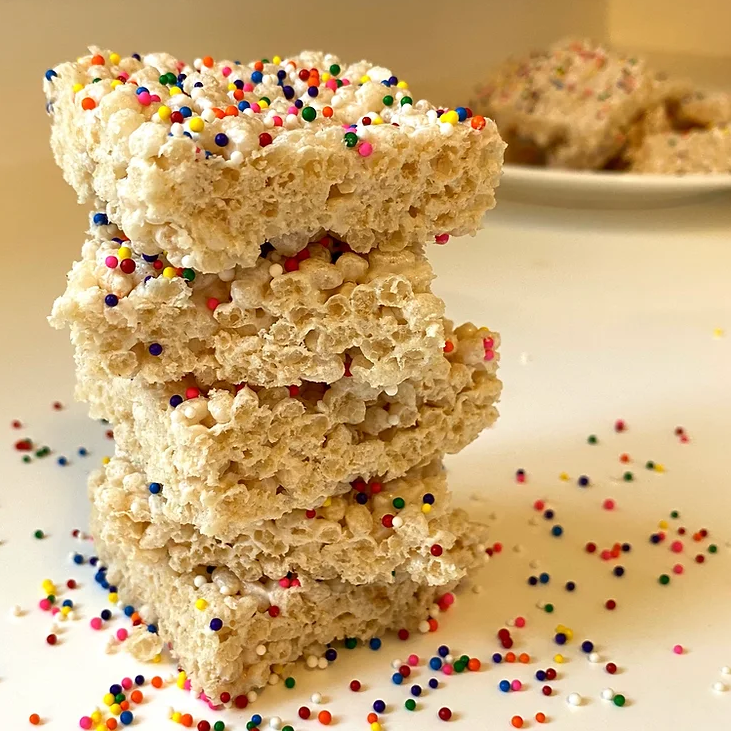
Vegan Rice Crispies
Details
Serving Size: 16 crispy treats
Total time: 50 minutes
Preparation time: 5 minutes
Cooking time: 15 minutes
Additional time: at least 30 minutes to chill
Shelf Life: 5 days in the refrigerator
Container size: Any size pan will work depending on desired thickness
Ingredients
½ cup aquafaba(the liquid from a can of chickpeas)
1 cup white sugar
2 tsp agar powder
½ tsp vanilla extract
½ tsp cream of tartar
5 cups of puffed rice cereal
Cooking tools required: hand or standing mixer
Instructions
1. Gather all ingredients and line a baking dish with parchment paper
2. Combine all ingredients (except for the cereal) in a saucepan over medium heat while whisking constantly. Simmer for 5 minutes, until everything has dissolved and the mixture looks like a thick syrup.
3. Transfer ingredients to a bowl.
4. Beat the mixture for 10-12 minutes with a hand mixer until the mixture has turned white and sticky.
5. Fold cereal into the mixture with a spatula
6. Pour mixture into baking dish, making sure to firmly press everything down so they stick. Now is the time to add sprinkles if you choose to!
7. Refrigerate or freeze until firm. Cut and enjoy!
TIP
When combining ingredients in the saucepan, start by whisking together the aquafaba and sugar until it dissolves, followed by the remaining ingredients. Make sure you whisk constantly while it’s simmering to prevent burning.
Made by Marissa Acosta
Recipes
by LIVING JIN on Nov 03 2022
1
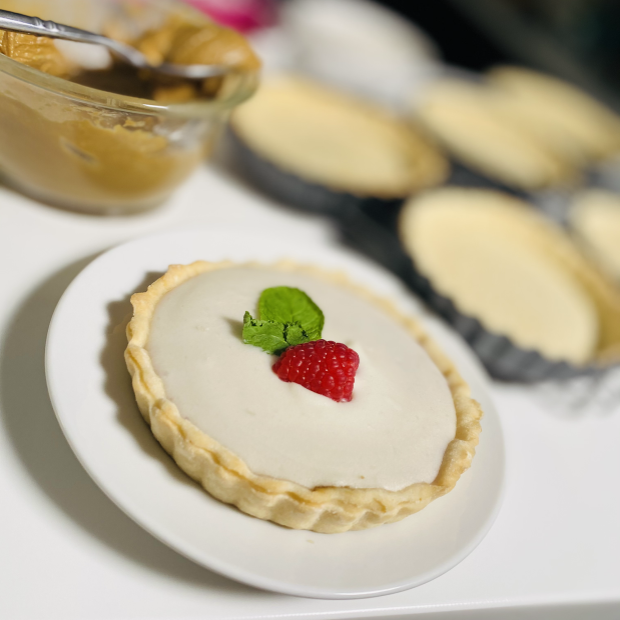
PB&J Fit for Kings and Queens
Details
Servings: 6-7
Total time: 2 hours and 30 minutes
Preparation time: 1 hour
Cooking time: 40 minutes
Additional time: chilling 30 minutes
Shelf period: Up to a week in the refrigerator
Container size: 4in mini tart pans, medium saucepan, hand whisk, and wire rack.
Ingredients
212g all-purpose flour or 1 1/2cups all-purpose flour
60g sugar or 1/3cup sugar
80g coconut oil or 1/2cup coconut oil
8tbs cold water
100g sunflower seed butter or 7Tbs sunflower seed butter
14oz grapes
2Tbs water
1 1/3cup sugar
15oz water
1tsp of citric acid or lemon juice
1 1/4tsp agar-agar
1tsp salt
13oz or 1 can of unsweetened coconut cream
3tsp vanilla (optional)
½-1cup of powdered sugar
20g powdered sugar or 2 tbs powdered sugar
5oz oatmilk
1/2tsp agar-agar
2 cup of rice
10 mint leaves for garnish ( optional)
3 raspberries for garnish ( optional )
Instructions
1. In a large bowl combine 212g of all purpose flour, 60g granulated sugar, and 1tsp of salt whisk that together. Then add your 80g of coconut oil and combine with your hands till your dough has an almost sand like texture.
2. Add *tbs of ice cold water to your mixture and mix it together till a loose dough forms. Then dump on your work surface and start to kneed for 3-5 minutes till the dough comes together. Then cover with saran wrap and let it rest for a couple minutes.
3. After your dough has rested take approx 100g of dough (about 6-7tbs) and roll it to be 6x5in square. Next you place it in your tart molds and cut off the excess. Then you get a fork and poke a whole bunch of holes at the bottom of the dough.
4. Cut a small square of parchment paper or wax paper and put it on top of your tart mold and fill it with rice. After you’ve filled all your tart molds preheat your oven to 350F. Bake your tarts for 10 minutes. After 10 minutes take out the parchment and rice and bake for another 5 minutes. ( The rice is to make sure the dough doesn't rise in the oven and the rice weighs it down)
5. While your tarts cool make your “peanut Butter mixture” Add 100g of sunflower butter to a small bowl and add about 20-24g of powdered sugar and mix till it becomes a paste like consistency.
6. Once your tart shells have cooled spread about a tbs of the mixture at the bottom of the tart shell. That's our first layer to our Pb&J fit for kings and queens.
7. To make our grape jelly we are going to wash 14oz of grapes. Next you are going to put your grapes in a medium sized sauce pan and crush with your hands. ( I recommend not to wear a white shirt or your white shirt will have delicious grape juice splatters on it) To your crushed grapes add 2tbs of water and bring it to a boil. Once it's been brought to a boil turn the heat down to low and simmer for 10 minutes.
8. After 10 minutes remove from the heat and strain the juice. To the juice you have left ad 15oz of water and bring the mixture to a low simmer.
Once the juice starts to simmer add 1 ⅓ cup of sugar and 1tsp of citric acid. Once your sugar is dissolved reduce for 5 minutes.
9. Now that your juice has reduced add 2 1/2tsp of agar-agar and cook on medium high for 3 minutes and make sure to whisk your mixture constantly. ( Make sure to taste your mixture before you add the agar-agar to see if it needs more acidity or sweetness.)
Take the pan off the heat and use a dropper or a spoon to distribute the jelly mixture into the tart shells.
10. While our jelly sets we are going to start our coconut cream. Take a can of coconut cream, vanilla, and powdered sugar and put it into a small bowl and start to whip it together.
( i use a handheld stand mixer because it easier but you can use a regular whisk you'll just be getting one heck of an arm work out)
11. Take 5oz of oatmilk and heat it up on the stove on medium high. When it starts to simmer add ½ tsp of agar-agar. After you let that cook down, slowly add it to your coconut cream while whisking. Once that's well combined add 40-50g in your tart molds and let it set in the fridge till it's time to serve. When it's time to serve your dessert fit for Royalty you can add your garnishes for a finishing touch.
( This recipe might be confusing because I use grams, as a baker I've noticed that weighing your ingredients leads to perfect results every time and it helps you make desserts fit for royalty. You don't have to use grams but I like my desserts to be very precise. But this recipe is all about fun and traveling back to your childhood so do anything you want and I totally encourage making this with kids because not only does it taste good and allergy-friendly it's really fun to make, especially mashing the grapes with your fingers.)
Made by Leyah Buster
Recipes
by LIVING JIN on Nov 03 2022
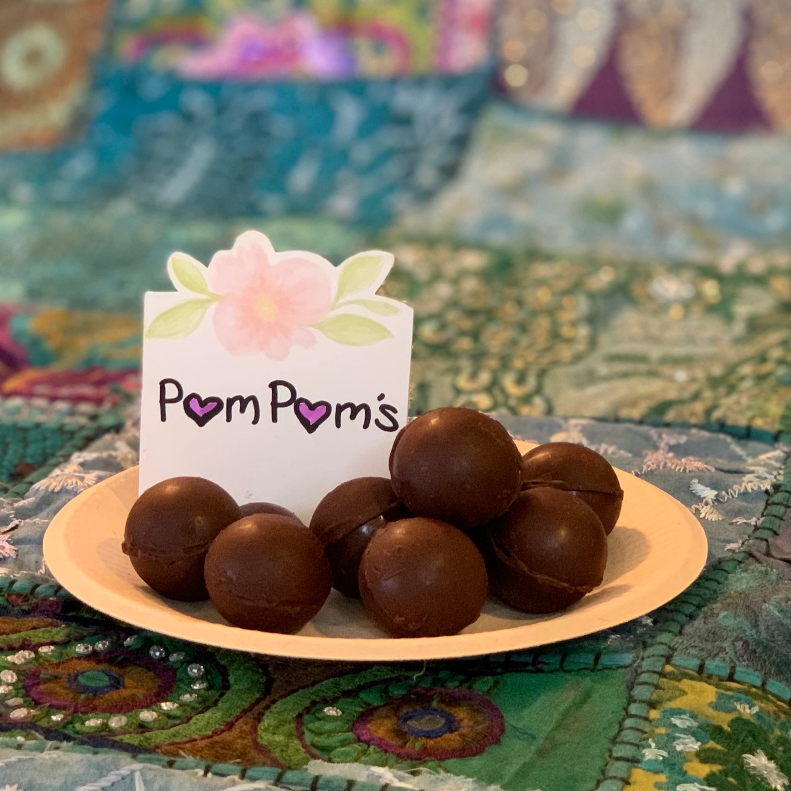
Pom Poms
Details
Makes 24
Approximate total time: 2 hours
Ingredients
1/2 cup juice (I used Pom Pomegranate juice)
1 1/2 tsp sugar
1/2tsp + a pinch agar agar
1 cup chocolate chips
1 Tbs coconut oil
4oz dark chocolate vegan chocolate chips (about 1/2 cup)
1/4 cup sugar
1/4tsp tapioca starch
(Makes about 1 gummy tray plus extra, enjoy the leftover bears as a treat! Toss them in caster sugar, and if you want them to be a little sour, blend the sugar with vitamin C crystals)
1/2 cup coconut cream (1 can) (if using full fat canned coconut milk, be sure to put the can in the fridge as soon as you get home to make it easier to remove the fat)
Chef Notes
If you are not vegan and prefer milk chocolate, feel free to use that!
Also to make these more fun and colorful you can use white chocolate and food coloring for the shells!
What you’ll need
Measuring cups (preferably metal, if not that’s okay too!)
Can opener
Measuring spoons
Plastic gloves
Small cheap paint brushes
Small sauce pot
Small Whisk
1-2 gummy bear trays
1 dropper
Small bowl
Spoon
Silicone Tray 1” half spheres
Sheet pan
Silpat mat/non stick mat
Rack
Small bowl
Spoon
Two snack sized or sandwich sized baggies
Instructions
Gummy bear part
The first thing you will need to do is make your tapioca so that it can set in time!
1. In a small saucepot combine juice, agar agar powder, and tapioca starch
2. Stir, and continue to stir as you heat the mixture until it comes to a gentle boil. Allow to boil for a few minutes, then turn off the heat.
3. After the mixture cools for a few minutes, use the dropper to fill the bears on the mold.
Be sure to pop any bubbles before they set.
4. Allow to cool on the counter so the mixture will set before you move them to the fridge to finish setting
Second part
5. Combine Chocolate Chips and coconut oil in a small microwave safe bowl.
6. Microwave in 20-30 second intervals, stirring between each until the chocolate is melted and smooth. Gently mix with a spoon to avoid making air bubbles.
7. Using a small spoon, on each tray fill 12 half spheres, pressing the chocolate all the way up on the sides. Then quickly swirl and turn the tray upside down over the rack that is inside a silpat lined sheet pan to allow the excess chocolate to drip out.
8. When the chocolate is done dripping out (it takes less than a minute), move the tray to the refrigerator to allow the chocolate to set.
9. While the first layer of chocolate is setting, we will make the pudding part of our filling and the come back to the chocolate spheres.
Third part
10. Put coconut fat in a small bowl. If chilled, microwave for 1 minute. If not, heat for 30-45 seconds.
11. Add your chocolate chips and sugar into the hot coconut fat. Stir until dissolved.
Microwave for an additional 30 seconds if needed to fully melt and dissolve chocolate and sugar.
12. Once all ingredients are fully mixed, allow to cool for a few minutes. Then pour the chocolate pudding into two plastic ziplock bags and place in the fridge to finish cooling.
Final Steps! (This may take a while....)
13. If you chocolate and coconut mixture has cooled, microwave for 30 seconds or until soft and runny.
14. Apply a second layer of chocolate in the half sphere molds.
15. While the chocolate is setting, let’s prepare our assembly station.
REMEMBER! when working with chocolate, you want everything to be cold. So crank the A/C or open a window to let cold air in. Work on a chilled surface like a chilled sheet pan or a cool stone counter top.
(To prevent a mess on the counter, lay down a layer of plastic wrap for an easy clean up) Have gloves, small paint brushes, and warm chocolate on stand by.
16. Remove your fruity bear tapioca from the molds onto a plat and set aside at your work station. Put any leftover fruity tapioca bears in an air tight container in the fridge to enjoy later.
17. Gently remove chocolate domes from the mold and put them on the chilled work surface.
18. By now, your pudding should be nice and thick, and not too runny. Fill half of your chocolate domes with the chocolate pudding, almost all of the way.
19. Place a tapioca bear on each half, and put a small glob of pudding on top of the bear, careful not to get any on the edge of the chocolate sphere. If you do, just wipe it away.
20. Now we are going to use the other empty chocolate spheres. Using your small paint brush, brush melted chocolate onto the edge and then press it onto the filled chocolate dome. Press together, and paint extra chocolate on the seem to help it hold. Place on the cool pan. Do this with all of your chocolates until they are finished and allow to set in the refrigerator for 30 minutes until set. Then gently remove from the molds, and enjoy!!
Adults only! You may use an exact knife to shave away any extra chocolate to make it into a more smooth sphere.
Alternatively, an adult can use a lighter to heat a metal measuring cup. Place the empty chocolate sphere on the hot metal to lightly melt the edges and place it on top of a filled sphere to fuse them together
Made by Linden Fussell
Recipes
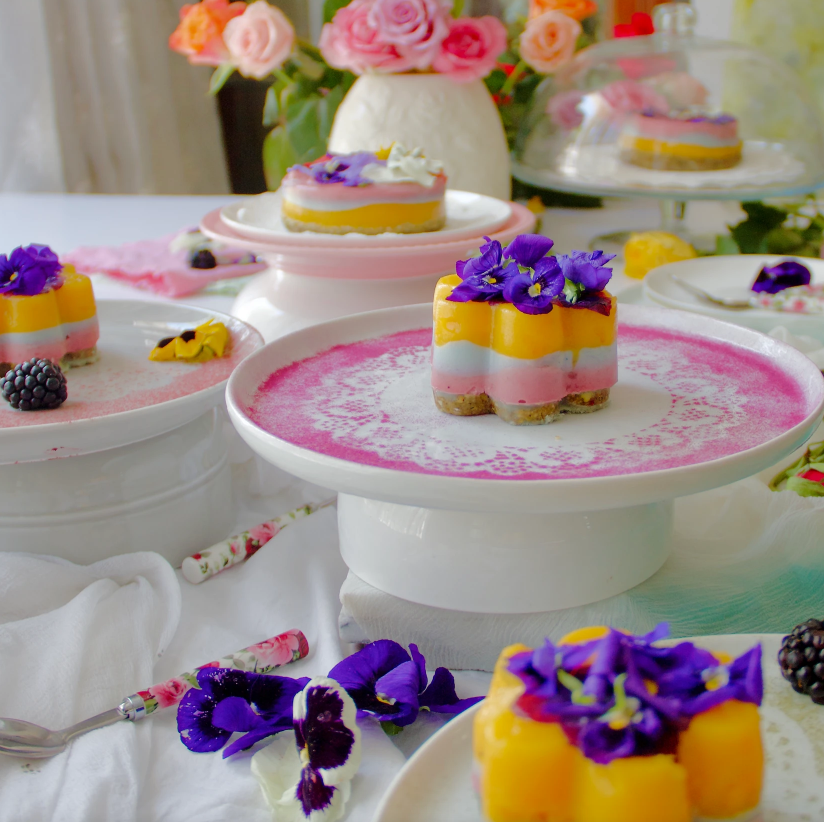
Berry Mango Blossom Mini Cakes
by LIVING JIN on Nov 03 2022
Spring is a season of colours, with blossoming of flowers and abundance of fruits. This Influenced me. Passionate about your health, then this fruit lover's dream is just for you. Loaded with fresh fruits with a nutty, crunchy base and sugar free , it satisfies your sweet cravings guilt free. Anyone who loves food. In Uae it would cost Aed 45. In the USA probably $ 5.5 - 6.
★Funfact! colourful vibrant sweet , Has a fragrant aroma
★ DETAILS
Prep Time: 20 minutes Cooking Time: 18 minutes Cooling Time: 2 hours Total Time (prep + cooking + cooling): 2 hours 38 minutes
Serve for 6 individual portions and two, 4 inches cakes
★SUITABLE DIET
vegan, vegetarian, gluten free, sugar free, protein rich, wholefood plant based
★ INGREDIENTS
Base
¼ cup each of roasted buckwheat groats, gluten free oats, pistachios, pumpkin seeds, golden raisins , 4 pitted dates, 3 tbsp pistachio butter, 1tsp each of cardamom powder, vanilla extract, few fresh mint leaves, pinch of salt.
Mango Fruit Layer
300g ripe mango puree, 2tsp agar agar powder, 50g fresh pineapple puree, 175g water, 30g finely chopped mango
Blue Spirulina Layer
250g thick cashew milk, 175g water, 2tsp agar agar powder, 1tsp blue spirulina powder, few blackberries.
Strawberry Layer
250g strawberry puree, 175g water, 2tsp agar agar powder, 115g thick coconut milk, few cut strawberries.
White chocolate 30g, a pinch of green spirulina. Fresh edible flowers to decorate.
★ INSTRUCTIONS
1. Base
Blend the dates and raisins. To it add the rest of the ingredients except nut butter and blend to a coarse sticky mix. Lastly, add the nut butter. Knead into dough. Place the dough between 2 parchment paper and roll it approximately ¼ cm thick. Cut out circles. Take 6 circles and place them in the flower moulds to get flower shape. Refrigerate for 10 minutes and take them out of the mould. They are ready.
2. Place the remaining 2 circles on the bottom of the 4 inch cake tin
3. For the flower moulds - Place the fresh flowers at the bottom.
4. Mango layer
dissolve the agar agar in the water. Bring to a boil, stirring continuously. Now add the mango and the pineapple purees to the boiling water. Stirring continuously. Once thickened, let it cool a bit, then pour into the moulds. Sprinkle some cut mangoes on top of it.
5. Blue Spirulina layer
dissolve the agar agar in water, bring to boil and add the milk and 1 tsp spirulina powder. Once thickened pour over the mango layer and add some blackberries.
6. Strawberry layer
dissolve the agar agar in water, bring to boil. Now, add the milk to it and let it boil. Take off the flame and add the strawberry puree to it. Combine well. Pour over the blue spirulina layer. Top it off with cut strawberries.
7. For the 4 inches mini cakes
follow the same procedure of fruit layers simultaneously and then decorate with fresh flowers.
8. Cool in the fridge till set.
9. Only for the 6 individual mini cakes. Melt white chocolate in Bain Marie style. Add green spirulina powder. Spread the melted chocolate on the crunchy base and immediately place the fruit layers on top of it. This will fuse the fruit layers with the crunchy base together. Place in the fridge for a few minutes.
※
For base -mint and cardamom is optional . i like the freshness of mint. Seeds , nuts and nut butter can be as per your taste buds.. Can also replaces dates and raisins with alternative sweetener. Can buy Kasha , or roast buckwheat groats at home till they turn golden brown. Fruit layers- can use fruits of your choice. Fruits need to be ripe and sweet. Coconut or cashew milk or a combination of both is the best. Decorate with or without flowers.
Made by Mona Irfan
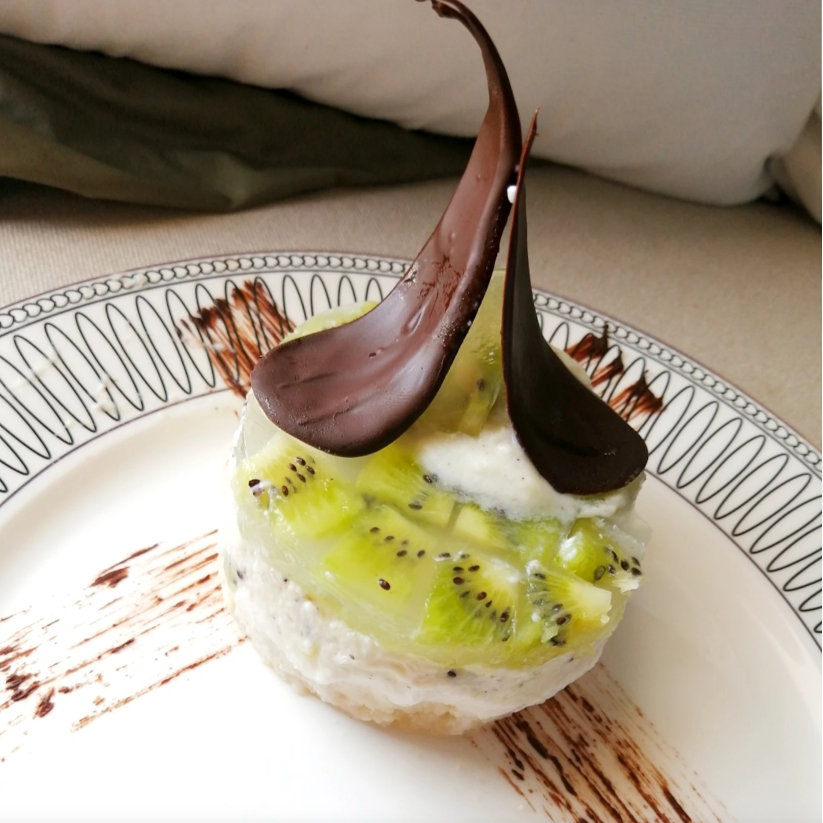
Recipes
by LIVING JIN on Nov 03 2022
Spring is in the air!! Colourful spring dessert to celebrate the season with kiwi dessert. A creamy dessert with kiwi goodness, it's a perfect spring dessert I think. This dessert is my preparation made with agar agar. Sponge cake filled with incredible light mousse and kiwifruit pieces. Kiwi jelly on top. A spectacular no-bake kiwi mousse cake is a perfect spring dessert.
★ DETAILS
Prep Time: 15 minutes Cooking Time: 20 minutes Cooling Time: 35 minutes Total Time (prep + cooking + cooling): 70 minutes
Serves for 6 people
★SUITABLE DIET
vegan, vegetarian, halal
★ INGREDIENTS
Cake Layer
Vanilla sponge cake - 100g
Kiwi puree - 1/2 cup
Sugar - 1/4 cup
Mousse Layer
Agar-agar powder - 1 tablespoon
Water - 1/2 cup
Whipping cream - 250ml
Chopped kiwi pieces - 3/4 cups
Condensed milk - 1/2 cup
Kiwi Jelly Layer
Kiwi cubed pieces - 3/4 cup
Sugar - 1/2 cup
Agar-agar powder - 1 teaspoon
Water - 3/4 cup
★ INSTRUCTIONS
1.Cake layer : In a thick bottom saucepan boil water, kiwi puree and sugar for 5 minutes. Switch off the flame and stain them. Place the thin cake layer in the pudding tray. Drizzle some kiwifruit juice on top of the cake layer.
2. Mousse layer : Boil the agar agar powder with 1/2 cup water. When it dissolved completely switch off the flame and set it aside for 5 minutes. Whip the cream until thick and add agar-agar mixture and condensed milk. Fold gently. At last add kiwifruit pulp and chopped kiwifruit pieces. The mousse layer is done now. Pour over the cake layer. Refrigerate until it sets.
3.Kiwi jelly layer : Boil water, agar agar and sugar in a thick bottom saucepan. When it dissolved completely. Switch off the flame. Arrange the kiwifruit pieces in a square tray and pour the agar jelly layer over the fruits. Refrigerate until it's done. Cut into any shape you like and arrange the top of the mousse layer. Serve chilled.
Made by Mrs Sohail
Recipes
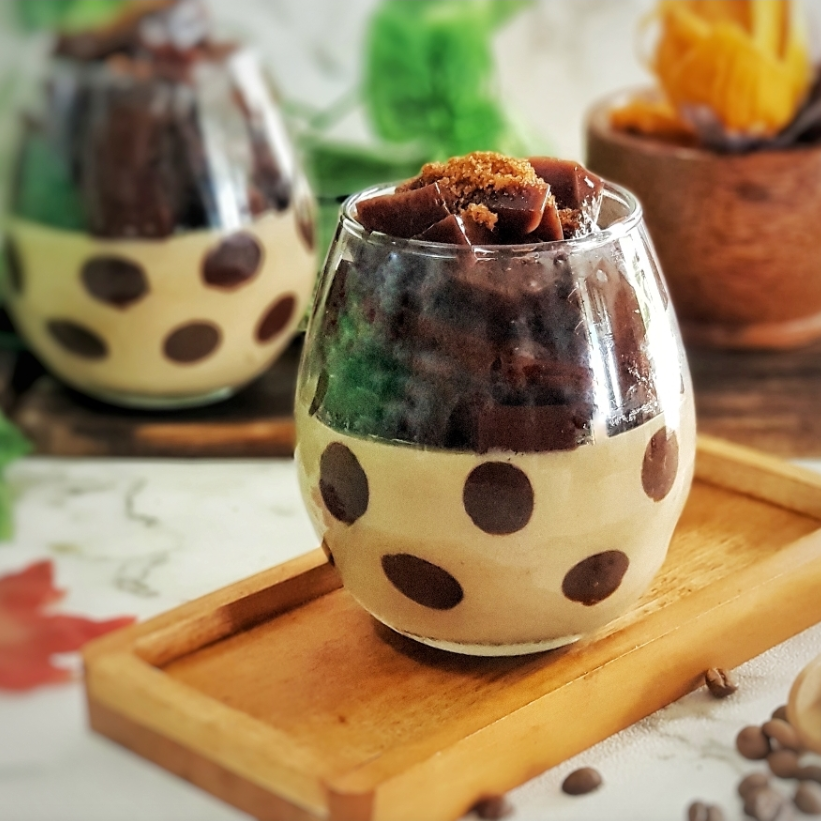
by LIVING JIN on Nov 02 2022
Coffee Choco Dessert
Details
Servings: 3 people
Total Time: 1 hours 45 minutes
Preparation Time: 30 minutes
Cooking Time: 15 minutes
Additional Time: Chilling for 1 hour
Shelf Period: up to 3 days in the refrigerator
Container Size: 6-inch glass
Ingredients
chocolate agar - agar powder 1 tbsp
sugar 2 ounce
water 3 cups
white agar - agar powder 1 tbsp
instant coffee 1 tbsp
liquid milk 3 cups
Instructions
1. add water
2. add sugar
3. add agar - agar powder
4. cook while stirring until boiling ..
5. pour into 2 different bowls, one thin square container, one normal square container
6. chill until hard, then cut to squares
7. cut the agar-agar in the thin container to rounds shape
8. stick the round agar - agar pieces to the rim of the glass
9. cook the white dough, add liquid milk
10. add sugar
11. add the agar - agar powder
12. add coffee
13. stir until it boils
14. pour the mixture into the glass, let it cool
15. pour the squares agar - agar into the glass
16. pour the squares agar - agar into the glass until it's full
17. serve cold and enjoy
Made by
Erna dapoeerna Prihandayani
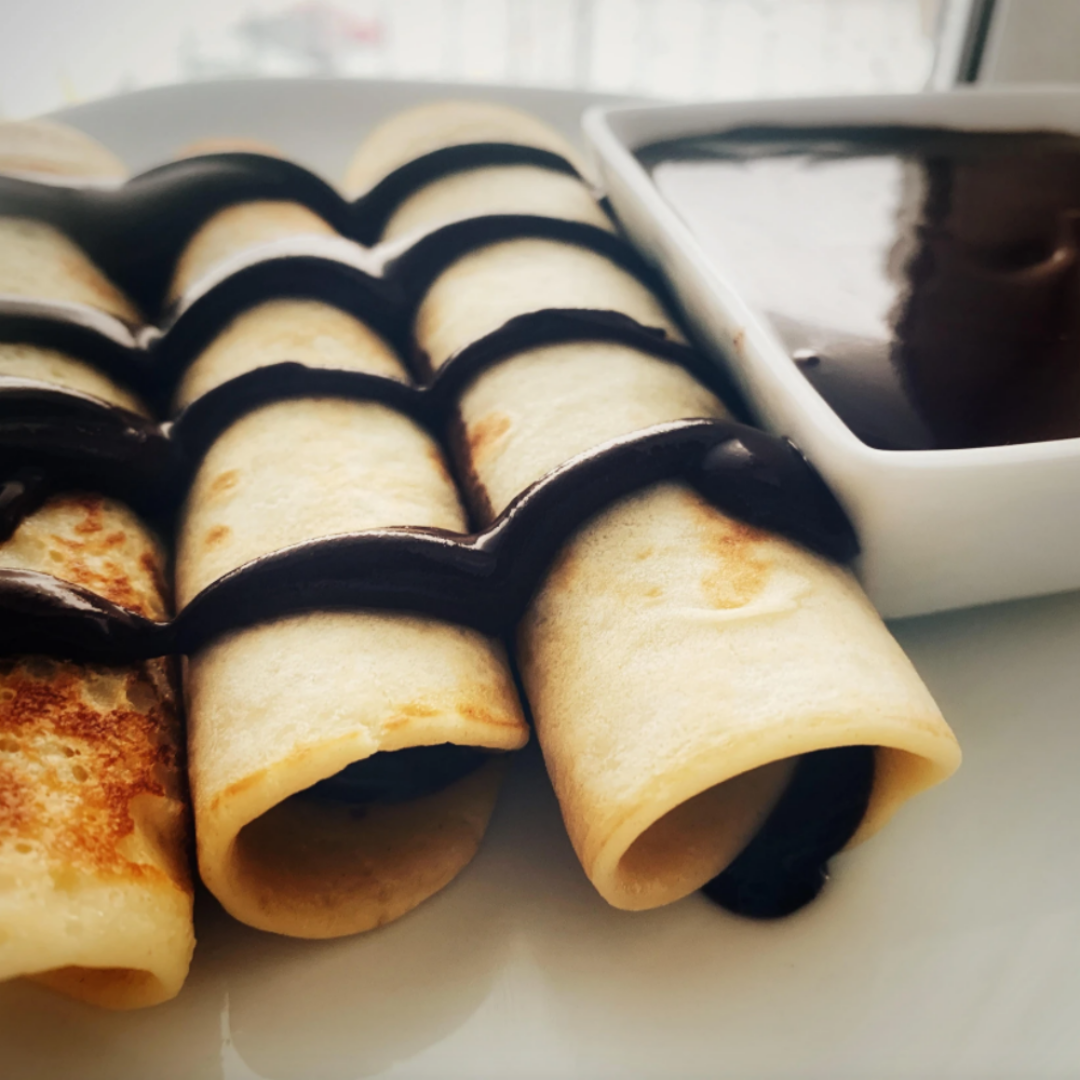
Recipes
Eva's Crepes - Vegan Dark Chocolate Sauce
by LIVING JIN on Nov 02 2022
Eva's Crepes - Vegan Dark Chocolate Sauce
Ingredients
3 Tablespoons Agar Agar
2.5 Cups Vegan Dark Chocolate (I like the brand HU), finely chopped
1 Cup cold water
½ Cup pure cane sugar
8 x 8 baking dish
Vegan butter or Coconut oil to grease the baking dish
Food processor
Instructions
1. Mix in Agar Agar into cold water in a pot. Stir continuously. Bring water to a boil and keep stirring until it is all dissolved. Once dissolved, gradually add in sugar. Remove from heat and let rest for a few minutes.
2. Boil 1 cup of water in a separate pot and add to cold water.
3. Pour it into a food processor. Now add in your chocolate. Mix on low until everything looks smooth. About 1 min or so.
4. Pour mixture slowly into your baking dish, using a spatula to thoroughly clean everything out.
5. Let sit in the fridge for about 1 hour or so or until slightly firm on top.
6. Mix it with a large spoon and add to ice cream, crepes, or fresh strawberries! Enjoy!
Made by Eva Pawelko
Recipes
by LIVING JIN on Nov 02 2022
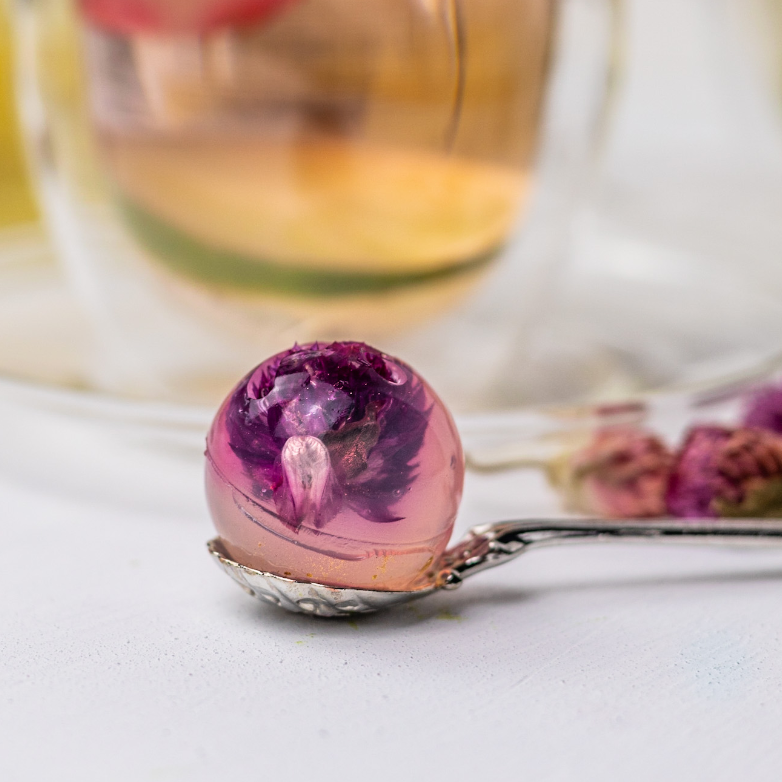
I was inspired by the beautiful blooming flowers in the spring season to make this unique and delicate recipe, to create a tea party at Nooria Cafe with Fairies. These tea bombs are a dessert kind of tea because they're sweetened with delicious drops of monk fruit. These are made from beautiful spring bloomed flowers like Gomphrena Globosa Linn, Red Globe Amaranth, Pink Roses, Jasmine Flower and Don’t forget me. The tea it’s made for everyone, kids and adults to bring joy and laughter at the tea party at Nooria Cafe. It feels like a tea party with Fairies where Fairies are serving the tea to little girls dressed up as princesses and boys as princes. The tea is affordable for everyone and the price is $5 per cup with a beautiful blooming tea bomb and lemon candy shapes.
★Fun fact!
These delicate and unique tea bombs are best made with little one and listen to a fairy background music for the best experience and fun.
★ DETAILS
Prep Time: 30minutes
Cooking Time: 5minutes
Cooling Time: 25minutes
Total Time (prep + cooking + cooling): 1 hour
Serves for 7 people
★SUITABLE DIET
vegan, vegetarian, dairy-free, gluten-free, low-carb, keto, paleo.
★ INGREDIENTS
- 2 ½ cups water
- 3 tsp agar agar powder
- 1 tsp pure rose nectar
- 18 drops monk fruit sweetener
- ½ juice of a lime
- ½ juice of a lemon
- ½ slices of lemon
- ½ slices of lime
★ INSTRUCTIONS
1. In a pot bring to a boil 2 cups of water.
2. Add monk fruit sweetener
3. Add 2 tsp LIVING JIN official agar agar
4.Bring to a boil and add agar agar. Boil for 5 min until all is well dissolved.
5.In an ice mold shaped as balls place the edible flowers, edible gold in each ball.
6. Pour the agar agar boiled mixture on top of the flowers in the molds. Use a syringe to fill in the molds.
7. Set in the freezer for 15 min.
8. I a different pot bring ½ cups water + lime juice + lemon juice to a boil
9. add 1 tsp agar agar and boil for 5 min.
10. In a candy mold cut limes and lemons in a round shape and place them inside the mold.
11. Pour agar agar mixture on top and set in the freezer for 15 min.
12. Make any kind of tea ( I did chamomile ) and place one tea bomb and lemon candy inside each cup.
13. Enjoy
Made by Ligia Derecichei
Recipes
by LIVING JIN on Nov 02 2022
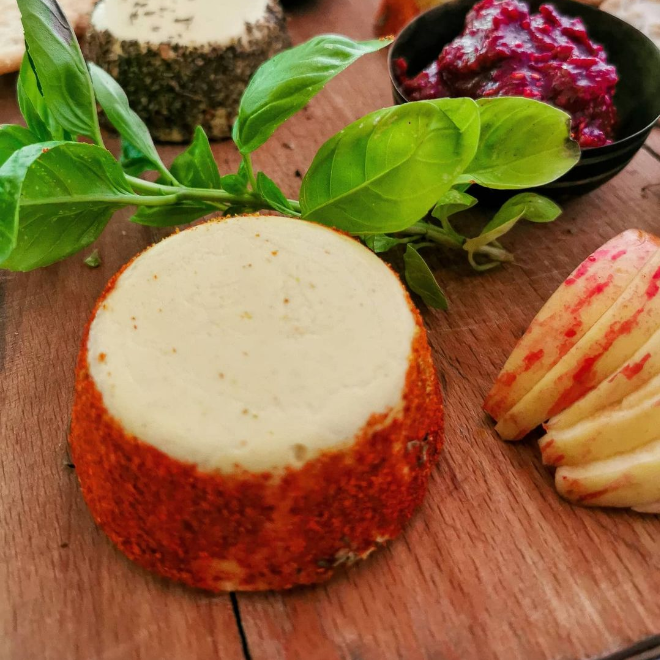
Easy, tangy, creamy vegan cheese infused with lemon, garlic and paprika, and nutritional yeast for that extra cheesy flavor. Soft, spreadable and oh so delicious! Perfect served up for starters, or dessert with a platter of crackers, grapes and Olives! ★Funfact!
You can make so many flavours of cheese wheels from this simple recipe, ie Mexican cheese with jalapeños and chilli's, chilli cheese, basil cheese with dried basil, garlic & herb and many more! Store-bought vegan cheeses are full of preservatives, additives and emulsifiers to make them last on the shelf. This is far cheaper to make than store-bought cheese It's super simple and literally requires a whizz on the blender /food processor! So many people tell me that the one thing they struggle to give up on a plant-based diet is cheese. We all know cheese is a hard substitute due to the lack of cheese varieties in stores. Try this recipe and you'll be in plant-based cheese heaven.
★ DETAILS
Prep Time: 40 minutes Cooking Time: 1-hour refridgerate to set Cooling Time: NA Total Time (prep + cooking + cooling): 1 hour, 40 minutes
Serves for 14 people, 7 cheese wheels
★SUITABLE DIET
vegan, vegetarian, dairy-free, gluten-free, low-carb, keto, paleo, halal, kosher, clean label
★ INGREDIENTS
156g (5 ½ oz) raw cashews 740ml (25 oz) water, divided 56g (2 oz) tahini 3 tbsp (1 ½ oz) lemon juice 1 oz coconut oil, plus extra to grease 3 tbsp nutritional yeast 1 tbsp Dijon mustard (optional) 2 tsp salt 1 tsp garlic powder ¼ tsp smoked paprika ⅛ tsp turmeric powder 1 tbsp agar-agar powder
TOPPINGS 3 tsp dried mixed herbs
★ INSTRUCTIONS
1. Place cashews into a bowl and cover in 415ml (14 oz) boiling water. Let sit covered for 30 minutes, then drain cashews and discard water.
2. Place drained cashews, 90 ml (3 oz) fresh water, tahini, lemon juice, coconut oil, nutritional yeast, Dijon, salt, garlic powder, paprika and turmeric into a food processor and blend until smooth.
3. Place 235ml (8 oz) boiling water and agar agar powder into a sauce pan and heat for 4 minutes, allowing mixture to boil for 1 full minute. Meanwhile, lightly grease a muffin tin for the wheel.
4. Add agar agar mixture to reserved cashew mixture in the food processor and blend for 10 to 15 seconds.
5. Transfer to greased moulds and refrigerate until set (approx. 1 hr.). Unmold by sliding a silicone spatula around edge of moulds. Roll edge of cheese wheel in mixed herbs and place onto a serving board. Serve with crackers, jam, sliced apples and grapes
Made by Priyanka savjani
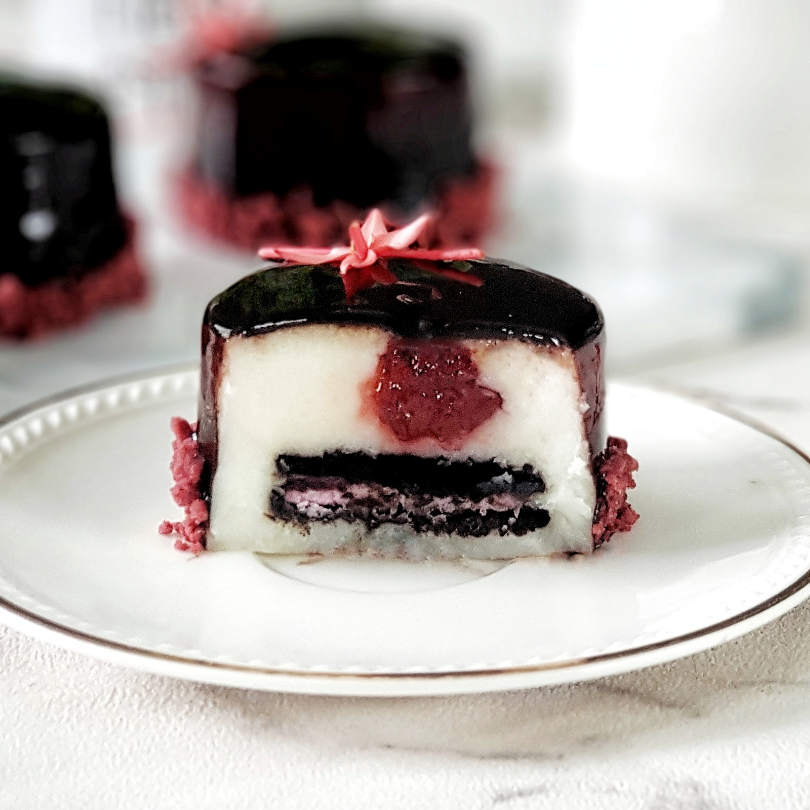
Recipes
by LIVING JIN on Nov 02 2022
This dessert menu will really spoil your tongue while also accompany you this spring ... the taste of milk in the pudding is then tucked into the sweet and sour of ressberry jam, then add the delicious Oreo chocolate cookies wrapped in ressberry sugar, and doused with legit chocolate ganache. .. the various flavors in this pudding will add excitement as a dessert in spring about how spring inspired the recipe; how you would describe the dessert in the menu; who you would recommend the dessert to; how much you would charge for it.. ★Funfact! This dessert is loved by everyone
★ DETAILS
Prep Time: 15 minute
Cooking Time: 30 minute
Cooling Time: 2 hours
Total Time (prep + cooking + cooling): 2.45 hours
Serves for 8 people
★SUITABLE DIET
halal, kosher
★ INGREDIENTS
Ingredients Agar-agar
2 tsp agar-agar jelly
1 ounce sugar /100 g
1 cup water /240 ml
1 cup whip cream
Ingredients other
8 tsp raspberry jam
10 pcs biscuit raspberry
Ingredients mirror glaze
250 ml cold water
9 gram gelatine sheet
Put gelatine in water 10 minute
MIRROR GLAZE
100 ml water
100 ml whipping cream
150 gram cocoa powder
150 gram white sugar
★ INSTRUCTIONS
How to make Agar-agar
Step 1: Cook all ingredients,
Step 2: Pour 1 cups of the ingredients into a small cups , add 1 tsp raspberry jam.. and then add 1 pcs oreo biscuit.. pour until full, chill it until stiff
How to make mirror glaze
Step 1 :Whisk cocoa, sugar and water: Place cocoa and water in a medium saucepan then mix until virtually lump-free. It will be like a paste.
Step 2 :Bring glaze to boil, Turn stove onto medium high heat. As soon as it comes to the boil..
Step 3 :Add heavy cream, Add a splash of cream to cocoa mix and stir. It will loosen up. then GENTLY continue to mix to combine. Do not mix vigorously and do not use a whisk..
Remove from the stove..!
Step 4 : Dissolve gelatine, Add gelatine, then GENTLY stir until it dissolves and you have a smooth glossy glaze. Straining 2 times...
SERVING
Step 1 :Transfer agar-agar to rack..
Step 2:Pour over mirror glaze
Step 3 :Transfer agar-agar to platter
Serve cold .. enjoy 🤗🥰
Made by Erna prihandayani
Recipes
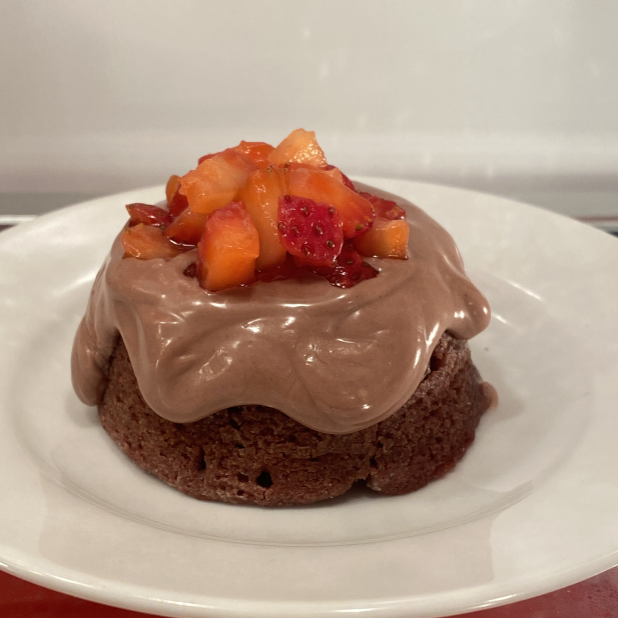
Strawberry Red Velvet Volcano Lava Cake
by LIVING JIN on Nov 02 2022
This was a hard recipe to come up with and ever since I was younger I loved anything red velvet. I'm not going to lie, thinking up something for a cheese volcano was very challenging until I thought of a lava cake. It literally has the word lava in it and works like a volcano. Then I had to think about how I would incorporate some type of cheese in that and I thought of cream cheese and that led me to think of red velvet. When you cut open into the “volcano” the cream cheese flows out like how I would imagine magma does when a volcano erupts. I would describe this dessert as a gift full of surprises. I would recommend this dessert to anyone who loves red velvet or anybody that wants to try something new.
★ DETAILS
Prep Time: 2hours 15 minutes
Cooking Time: 15-18 minutes Total Time: 2hours 30 minutes
Serves for: 18 people
Size of container: 2.75in (or any size)
Shelf Period: up to 1 week in the refrigerator
★ SUITABLE DIET
- Vegetarian
- Non-GMO
- Nut free
- No color
- For kids
★ INGREDIENTS
1 large beet or 2 medium beets
butter ¾ cup / 170grams
oat milk ¾ cup
vinegar 2 tsp
1 lemon
rice vinegar 2 tsp
vanilla extract 1 ½ tsp
flour 2 cups/200g
cocoa powder 3 tbs/ 24g
baking powder 1 ⅛ tsp/6g
salt 1tsp/6g
baking soda ½ tsp/3g
granulated sugar 1 ¾ cup/350g
eggs 3
cream cheese 1 8oz pack
butter ¼ cup
powdered sugar 1 cup powdered
strawberries 8oz
agar-agar powder 2 tsp
White chocolate ( optional )
Supplies needed :
Stand or hand mixer
Muffin pan or ramekin
Glass tupper ware
Spatula
Wired rack
Cookie sheet
Foil
Blender or food processor
★ INSTRUCTIONS
🧩 Step 1
1) Preheat your oven to 4000F.
2) Next, wash and dry your beets very well.
3) Then, wrap your beets in foil and let them bake in the oven for 1 hour or until a knife goes smoothly inside the beet.
4) Make sure you place your beets on a cookie sheet before they go in the oven to catch any drippings.
🧩 Step 2
1) After your beets have cooked turn off the oven and let them cool inside the oven. 2) Once they are warm to the touch you are going to peel and dice the beets up. 3) Set 1 cup of the beets to the side and if there’s any extra use them for another recipe.
🧩 Step 3
1) While the beets have been set aside we are going to make our buttermilk.
2) You can buy pre-made buttermilk but I prefer to make my own.
3) To the ¾ cup of oat milk, you are going to add 2tsp of vinegar and let set for a few minutes.
4) Now to a blender you are going to add your beets, buttermilk mixture, vanilla extract, and the juice of one lemon and blend till smooth.
🧩 Step 4
1) Now you are going to sift all your dry ingredients and have them in a separate bowl. 2) Then you are going to cream your butter and sugar till it’s fluffy then slowly add in the 3 eggs till it’s fully incorporated.
🧩 Step 5
1) Next, your gonna slowly incorporate the dry mixture and the wet mixture alternating turns.
2) Start with the dry mixture and end with the dry mixture.
3) Then mix till fully incorporated.
4) If there is separation in the batter or it starts to look clumpy that’s completely normal.
The processing photo are missing now, will update in future
🧩 Step 6
1) You are going to set the batter aside and now make the cream cheese mixture which is gonna be our “lava”. 2) In a bowl, you are going to cream 8oz of cream cheese and ¼ cup of butter together along with 1 cup of powdered sugar and 1tsp of vanilla extract.
3) Once it’s fluffy set it aside for later.
The processing photo are missing now, will update in future
🧩 Step 7
1) We are now going to make our “magma” that’s gonna go inside our “volcano”. 2) You are going to dice up 8oz of strawberries into small cubes.
3) After you dice up your strawberries add about ½ cup sugar to the strawberries and let them make their own “juice”.
4) What we are making is basically macerated strawberries.
5) After your strawberries have made their own juice you are going to separate your strawberries from the juice.
🧩 Step 8
1) In a saucepan, you are gonna add in the strawberry juice and let it simmer.
2) Once it’s up to a simmer you are going to add your 2tsp of agar-agar and pour in a container to set.
3) After it’s set, you are gonna dice your strawberry jelly or “magma”.
🧩 Step 9
1) Now it’s time to assemble our volcanos. 2) Preheat your oven to 350F. In a muffin pan or a ramekin, you are going to butter and flour it so it doesn’t stick or spray non-stick spray.
3) First, you are going to fill up the muffin tin cavity ⅓ of the way with batter.
4) Then you are going to scoop some of the cream cheese mixture and place it inside along with the cut-up strawberry jelly pieces.
5) Then put enough batter to cover the cream cheese and strawberry jelly.
🧩 Step 10
1) Then we are going to place the cakes in the oven to cook for 15-18 minutes.
2) After you take them out of the oven serve immediately and enjoy.
🧩 Step 11 (optional)
1) To make your volcano “fancy” after it comes out of the oven melt chocolate over the top and add the diced-up strawberries you have left.
★ Helpful Tips!
Take your time and make sure not to overfill the lava cake with cream cheese. Because once you flip them over to take them to the “lava”will go straight through the wired rack and you will now have a dormant volcano.
Made by Leyah Buster
Recipes
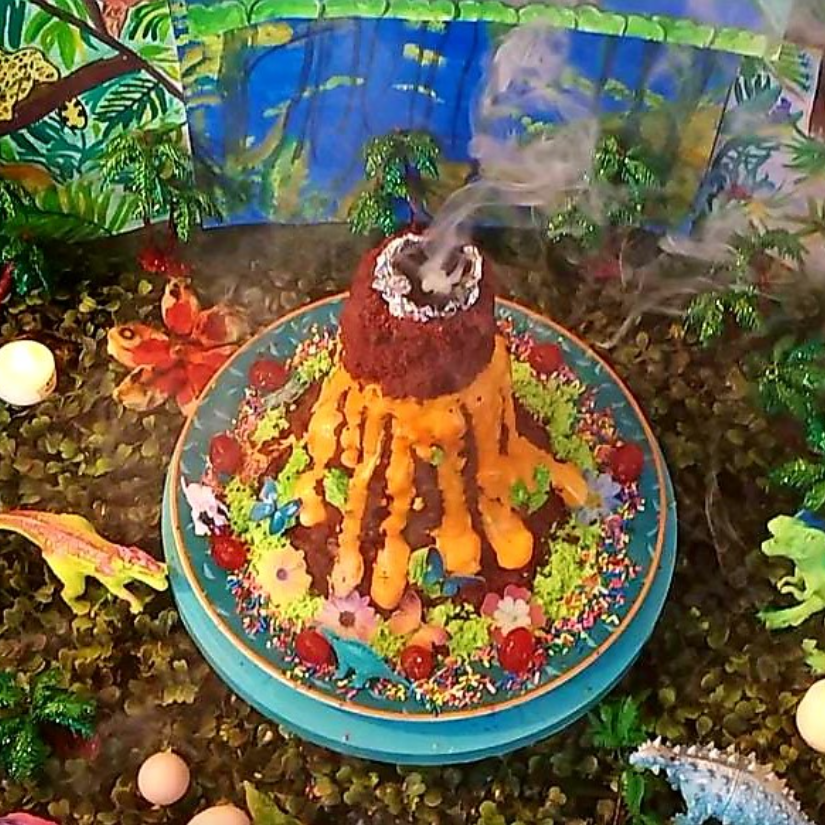
Lively Ooey Gooey Cream Cheese Volcanic Cake
by LIVING JIN on Nov 02 2022
1
Ever since my childhood, I have been watching my mother making scrumptious dishes with love and dedication. When I was in class VII, we had gone on a picnic and my mother had made choola with tricolor pulao, I helped my mother in little ways. During lunch when she opened the food basket, the aroma made everybody nostalgic not to mention the taste & flavor left everyone in awe. My mother was very happy, and I felt elated with appreciation. It was at that moment of, when I fell in love with cooking and serving to my family and friends and the trend continues.
★ DETAILS
Prep Time: 1hour 30 minutes
Cooking Time: 30 minutes Additional time: 15 minutes Total Time: 2hours 15minutes
Serves for: 6 to 8 people
Size of container:
Container 1 (height 7 inches / diameter 12.1cm)
Container 2 (height 4 inches / Diameter 11cm)
Container 3 (height 2 inches / Diameter 8.6cm)
Shelf Period: up to 7days under refrigeration
★ SUITABLE DIET
- vegetarian
- for Kids and everyone
★ INGREDIENTS
Chocolate Cake
All-purpose flour
Cocoa powder
Baking powder
Milk powder
Milk
Vanilla essence
Vegetable Oil
Cheesecake & Orange jelly
Agar-agar powder - 5g
Water - 1 cup
Full-Fat milk - 1L
Vinegar mixed (2 tbsp) mix with water (1tbsp)
Amul Fresh Cream - 2 tbsp
Utensils & Tools needed:
Turntable
Knife
Tongs
Mixer Grinder
★ INSTRUCTIONS
🍫 1. Chocolate Cake part
I know what you are thinking, no way this cake gets ready in 4 minutes. But I am here to tell you that it does.
One major benefit of making a cake in the microwave is that it takes very little time than it would take time in baking a cake in an oven. So, whether you are baking a cake last minute for any party or occasion that you forget, or just because you want to, then you must try this recipe.
My cake that comes in 4 minutes from the microwave is the most amazing in the world.
Step
1) In a bowl add all-purpose flour.
2) In the same bowl add sugar and mix well.
3) Add baking powder to it and mix well.
4) Make sure to be gentle and not knock out all the air from the batter.
5) Add cocoa powder and mix again.
6) Then add red color to it. After that, add oil to it and give it a good mix.
7) Then add milk to it.
8) Lastly, add in vanilla essence, mix it well.
9) Transfer your batter to a microwave-safe dish
(previously y greased with oil and dusted with flour).
10) Cook this in the microwave for around 4 minutes on high (100%) power.
11) Your cake is ready for a volcano eruption.
🧀 2. Homemade Cream Cheese with Agar-Agar part
Most of the time people buy cream cheese from the market, but today I am going to share my homemade simple and easy recipe for cheese cream.
Step
1) Take a large pot and add full-fat milk to the pot and heat it but do not boil
2) Add 2-tbsp vinegar and 1-tbsp water keep stirring and mixing
3) When Milk is busted drain out the water but do not wash it. We want the sourness of vinegar to be retained.
4) Take cottage cheese in the mixer grinder.
5) Add 2-3 tbsp fresh cream to it.
6) Add 2-3 tbsp Condensed milk to it to get creamy texture.
7) Now, close the lid of it and churn it for 2-3 seconds.
8) Now Cream Cheese is ready.
9) Now, to get started with the agar-agar solution, take a pan and heat 1cup of water.
10) Now, add 5grams of Agar-Agar powder to warm water.
11) Heat the agar-agar on a low flame and stir continuously. In about 5 minutes the agar-agar began to dissolve completely
12) Now add about 2 tbsp of the prepared Agar-Agar solution to cream cheese mixture and you can sieve it to remove any lumps. Keep aside the remaining Agar-Agar.
13) Refrigerate it for 1 hr.
14) Now cream cheese is ready as a filling of lava.
🍮 3. Homemade Agar-Agar Orange Jelly part
Homemade Orange Jelly, no need to buy ready mix from the market.
Step
1) Take the prepared 1 cup agar-agar Solution.
2) Add ½ tsp orange color and add ½ tsp orange essence to it and stir well.
3) Pour it in the bowl and refrigerate it for 30 minutes.
4) Now Orange Jelly is ready as a filling of lava.
🍫 4. Assembling of Cakes to give Volcano Looks
Step
1) Take the biggest cake of the three and place it on plate and hollow it from the center in thin cylindrical from.
2) Now, take the molten chocolate and spread on the sides and on top of the cake.
3) Now, place the medium sized cake on this and make it hollow from the center too.
4) Now trim the cakes from the side using a knife to give it a volcano shape and cover the complete cake with molten chocolate, from top and sides.
5) Now fill the hollow cavity of the cake with Agar-Agar Cream cheese, orange jelly and some sprinklers and decorate the cake with some paintings of woods, trees, dinosaurs, green grass made of white chocolate, etc.
6) Now close the top of the cake with smallest cake
7) Place a small piece of foil on the top.
8) Then place some burning coal on it.
9) Put a drop of clarified butter on it to give a smoky effect.
10) Finally, our Lively Ooey Gooey Cream Cheese Volcanic Cake is ready for eruption.
★ Helpful Tips!
Don’t leave the cake open as it will become dry.
Don’t boil water, just heat it for preparation of Agar-Agar solution.
Wash your hands before start cooking.
Made by Anjul Arora
Recipes
by LIVING JIN on Nov 02 2022
I have made a savory kind of chiffon cake with cheese flavor. I used agar-agar powder to make red milk cubes, imitating lava rocks oozing out from beneath the Earth. You could definitely also colored your whipping cream to red to resemble red lava flowing out from the ‘crater’. Depending on how rich you prefer your cake dessert, you can sprinkle as much shredded cheddar cheese as possible 😊
★ DETAILS
Prep Time: 20 minutes
Cooking Time: 40 minutes (include baking time)
Total Time: 2 hours 30 minutes
Serves for: 6 people
Size of container: 6” Ø x 11cm height
Shelf Period: 1 week in fridge
★ SUITABLE DIET
- Nut-free
★ INGREDIENTS
Milk Magma Jelly
Milk 600ml
Sugar 1tbsp
Agar-Agar Powder 2 tsp
Jelly Powder (optional) 1/2 tsp
Red coloring or Red Yeast Powder
Cheese Chiffon Cake
Egg Yolks 2
Oil 26ml
Milk 30ml
Vanilla Essence 1/2 tsp
Cheese Powder or Parmesan Cheese Powder 1-2 tbsp
Cake Flour 38g
Egg White 2
Lemon Juice 1/4 tsp
Sugar 20g
Cornstarch 1/2 tbsp Snow Cream
Redman Whipping Cream 75g
Sugar 1/2 tsp Other
Cheddar Cheese, shredded Appropriate Amount
Supplies needed
Mixing bowls
Spatula
Whisk
Electric Beater
Sieve
Measuring Spoons
Measuring Glass
Weight Device
★ INSTRUCTIONS
1. Milk Magma Jelly
Step
1) Measure 600ml Milk into a cooking pot.
2) In a small bowl, gather - sugar, agar-agar powder, jelly powder. Whisk to combine.
3) Pour dry ingredients into Milk. Stir to dissolve.
4) You can add red coloring or natural red yeast powder (2 tsp).
5) Boil over stove at medium heat. Stir occasionally to ensure dissolve and avoid skin form on surface.
6) Turn heat to low and boil for another 1 minute.
7) Leave asides to slightly cool before pouring into a rectangular mold.
8) Fridge until solidify. Cut into cubes.
2. Cheese Chiffon Cake (Preheat your oven at 180 deg C)
Step
1)Add lemon juice into egg white. Whisk until foamy.
2) Add half of the sugar and continue to high whisk until soft peak achieved.
3) Add the remaining half sugar. Whisk until firm peak.
4) Low whisk for another 1 min. Set aside.
5) Whisk egg yolks until fluffy and slightly pale yellow.
6) Add in Oil, Milk & Vanilla Essence. Whisk to just combine.
7) Add in Cheese Powder. Whisk to combine.
8) Fold in your sifted Cake Flour. 9) Take 1/3 of your fluffy egg white into your yolk mixture. Fold to combine.
10) Now, pour your yolk mixture into the egg white bowl.
11) Carefully fold to combine.
12) Pour into your chiffon cake pan. Tap it on your table to release air bubbles.
13) Bake at 180 deg C for 10 mins. Turn down temperature to 160 deg C and continue to bake for 25 mins. Note that every oven’s temperature differs. Please adjust accordingly. Use a skewer or cake tester to check for doneness,
i.e.: no crumbs attached.
14) Immediately overturn your chiffon cake pan for cooling. It is advisable to remove cake from mold only after it has been cooled completely.
3. Snow Cream
Step
1) Whisk your whipping cream to about 60% firm only so that it can flows to the side of the cake later.
4. Assembly
Step
1) Scoop some of your whipped cream to the top of the chiffon cake.
2) Let it flows naturally down from the side of the cake.
3) Sprinkle as much shredded cheddar cheese on the top of whipped cream as you like.
4) Put your cubed milk magma jelly into the middle hollow of the cake.
5) sprinkled some edible dark pink metallic powder on top too.
6) Voila! Fridge cake till ready to serve.
★ Helpful Tips!
Ensure your egg white bowl is clean from any oil / yolk. Otherwise, it would ruin your egg white for beating.
Adjust cheese powder into your cake yolk batter to your likings. However, putting too much will make your cake saltier though.
Whipping your cream to about 60% will be like ‘ribbon flow’ consistency.
It is best to finish this cake in 3 days’ time. Chilling in fridge too long will dry-up the chiffon cake texture.
Made by Ms. VJ